Get special upgrade deals!Sign in to see if you qualify for deals.
Your cart is empty
There are no items in your cart
Taxes:Calculated at checkout
Subtotal:$0.00
Keep shopping
You own this software | Purchased on
Included Software:
Get special upgrade deals!Sign in to see if you qualify for deals.
Join Mixed In Key
Please log in again to continue.
Please sign in to view your owned products.
or
Email address
Please enter a valid email address.
By signing in, you consent to receive marketing emails and text messages from Mixed In Key. You may opt out at any time.
To verify your email, we've sent an email to . This code will expire in
You can resend your code in ()
Didn't get a code?
You've entered an invalid code. Please try again
Your code has been resent, check your inbox. If you're having trouble check your junk mail.
Tell us about yourself
Please enter your first name
How to use MIDI FX with Ableton
Maximize your MIDI with our handy guide. We’ll take a look at Ableton’s MIDI FX units and how to use them.
What is MIDI FX?
MIDI FX (effects) tools come as standard with most DAWs, and offer a whole range of ways to shape the output of MIDI
Instruments.
MIDI is the current standard method of sending musical data between devices. This can be in the form of a keyboard
‘talking’ to a piece of software to generate notes, or a controller turning its knob to change a parameter on
another device, or piece of software. It can transmit information between hardware and software equally.
When we talk about using MIDI FX, we’re describing ways to control a MIDI instrument using the MIDI Effects tools
within your DAW, such as Logic Pro X or Ableton. Different DAWs have different tools, meaning some functions are
unique to certain DAWs, while most share at least a few generic effects tools.
There are 7 MIDI Effect tools in Ableton Live, plus a MIDI FX Rack. Let’s take a look at what they do, and how to use
them
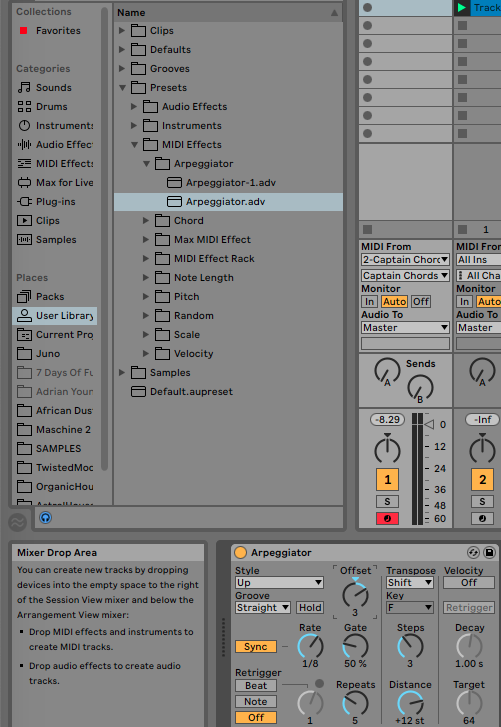
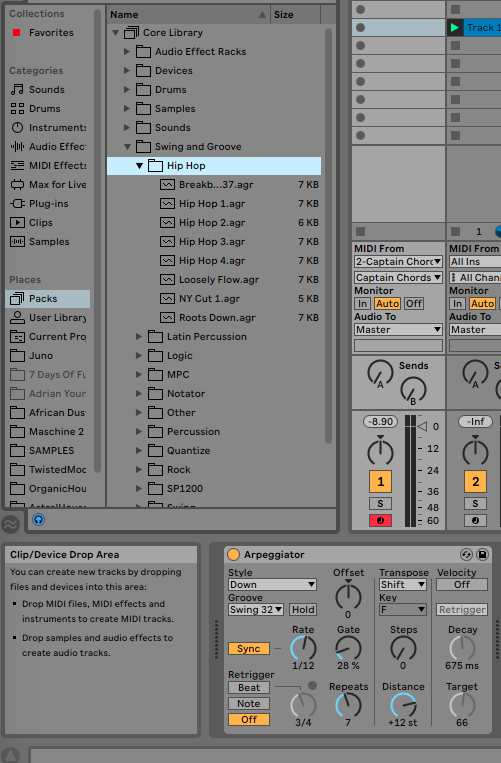
Arpeggios are a classic tool to create energy in a melodic line. The Arpeggiator tool in Ableton is a powerful,
multi-dimensional tool that can transform any MIDI clip in myriad ways.
It works by re-triggering the current MIDI note, and playing the notes of its root chord in individual, sequenced
notes.
You can control how fast it re-triggers, how long each note should last, and many more parameters. You can also
instruct the pitch to increase or decrease in increments – often octaves – or play all the notes in a designated
scale.
It’s an incredibly powerful tool that can be heard in countless songs across the ages.
Let’s investigate the Arpeggiator’s main functions
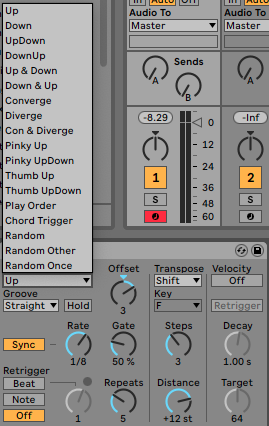
Style
This references the direction of the re-triggering notes in the arpeggio. So, if you have a note in your MIDI clip,
the arpeggiator will re-trigger each note in the associated chord in the selected direction and order.
If your MIDI clip is already a chord, the Arpeggiator will retrigger those notes. So, instead of playing a chord, it
plays a sequence of individual notes within that chord.
‘Up’ tells the arpeggio to start at the lowest note and work upwards.
You can guess what ‘Down’ therefore does.
‘UpDown’ and ‘DownUp’ flip-flop up and down as they progress through the arpeggio.
‘Up and Down’, and ‘Down and Up’ signifies that the arpeggio will play all the way Up, then cascade back Down,
or vice versa.
‘Converge’ triggers the bottom and top-most notes first, then the notes in the middle of the arpeggio.
‘Diverge’ does the reverse – it starts with the inner notes and moves on to the outer notes.
‘Con and Diverge’ blends these two functions together.
‘Pinky Up’ and ‘Pinky ‘UpDown’ relates to the ‘pinky finger’ of a keyboardist. This means the little finger,
which plays the higher note of a chord or scale, if played by a human. Both of these settings see the ‘pinky’
note, or topmost note, triggered on every beat, while the other notes in the chord play in between.
‘Pinky UpDown’ is the same as Pinky Up except it adds a downstroke once the Pinky Up sequence has completed.
‘Thumb Up’ and ‘Thumb UpDown’ do the same, but centred around the lowest note in the chord. This is the note
that a keyboardist would likely play with their thumb.
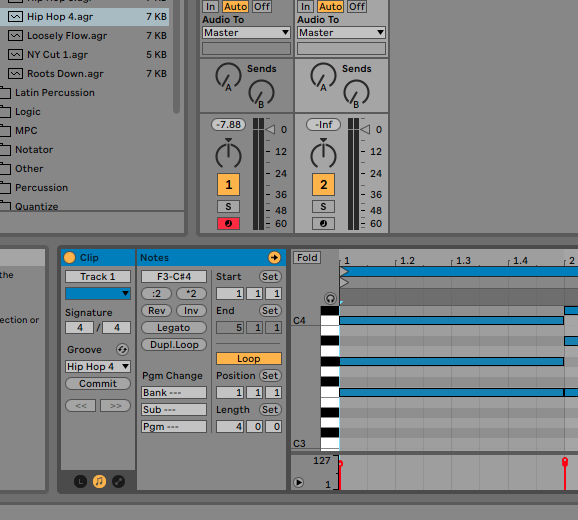
Groove
Also known as Swing, or Shuffle, this setting affects how precisely the arpeggio plays in time with the track. There
are 4 Groove settings, which can be adjusted using the Groove Pool tool.
This is external to the Arpeggiator tool, so you’ll need to add a Groove file to your MIDI Clip in order to modify
the 4 settings.
Straight. 100% in time with the beat.
Swing 8: Swing is applied to every 8th beat.
Swing 16: Swing is applied to every 16th beat.
Swing 32: Swing is applied to every 32nd beat.
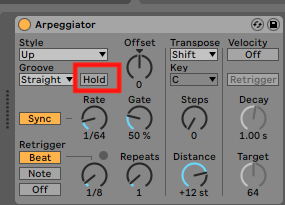
Hold
This mysterious button sits next to the Groove tool, but has nothing to do with Groove. When turned on, Hold tells
the arpeggiator to continue working even after the MIDI input has ceased inputting commands.
PRO TIP
If you’re not fast enough at playing to change between notes or chords in your arpeggio, use the Hold button to
give yourself plenty of time to find the next note(s). Hold will keep the arpeggio repeating until the next time
you input MIDI commands.
To end the arpeggio, press Hold again.
Set Hold On/Off to a control on your MIDI keyboard or controller for easy access.
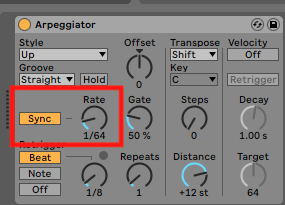
Sync
Syncs the arpeggiator tempo to the DAW.
You can then select the division at which your arpeggio plays back. The smaller the division, the faster the
arpeggio triggers notes.
Turning Sync off allows you to set your own tempo from a note every 10 milliseconds to a full second.
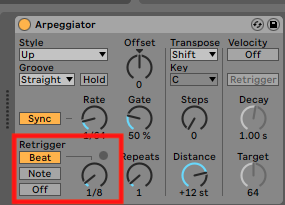
Retrigger, Beat and Note
Retrigger: This function allows you to specify when the arpeggiator should retrigger.
Beat: The arpeggio will restart when the selected timing division has been reached. So, a setting of ¼
would retrigger the arpeggio on every 4th beat of the bar.
Note: The arpeggio will restart every time a new note is input.
Off: The arpeggio will play through until its full cycle has concluded, and then repeat.
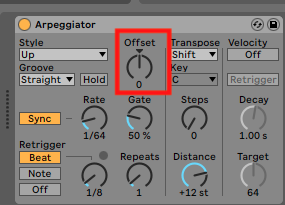
Offset
You can instruct the arpeggio to start from a different note in the scheduled pattern by adding or decreasing notes
in the Offset tool. Adding ‘1’ means the arpeggio will play from the 2nd note in the pattern, ‘2’ will start on the
3rd and so on.
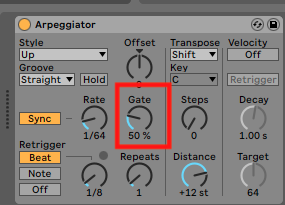
Gate
Gate controls how long the notes in the arpeggio will play for before muting. Higher setting mean longer notes and
vice versa. Longer notes than 100% will start overlapping.
Transpose
This tool enables the incoming MIDI notes to be forced into a specific scale, which can be set as Major or Minor.
Alternatively, you can select Shift, and rather than using the notes of specific scales to determine playback pitch,
the transposition will occur in semitonal increments.
Furthermore, the Shift function can be used to control how long the transposition takes to reach its maximum state.
PRO TIP
Combine Shift Transposition with Velocity controls. You can create really human sounding effects by turning the
Decay and Target settings down in Velocity, increasing Shift to +12 or +24, then experimenting with Steps and
Retrigger.
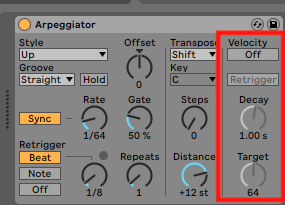
Velocity
Velocity has 3 main controls:
Retrigger: Tells the velocity whether to follow the Retrigger setting or bypass it.
.
Decay: Controls how quickly the arpeggio ends from its starting point.
Target: The destination volume. A target of 0 will induce the arpeggio to fade out, at a rate determined
by the Decay setting.
Meanwhile, a Target of 127 will keep the arpeggio playing at maximum volume.
The sound the Arpeggiator functions create varies depending on combinations of settings. By combining functions it
is possible to create some intense and unique arpeggios, or even emulate human performance like strumming or
plucking.
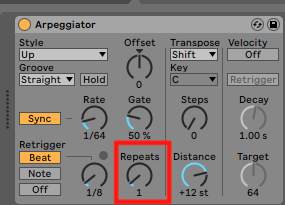
PRO TIP
You can turn the often mechanical sound of arpeggios to a human-like strum by combining a few settings.
Set Retrigger to Beat with a value of 1/16, Repeat to 1, Gate to 50% and Distance to +24. Now set the Rate to
something fast like 1/64 and set Steps to 2 or 3.
Instant strumming effect!
Check the video below that shows how to achieve this (and a few variations)
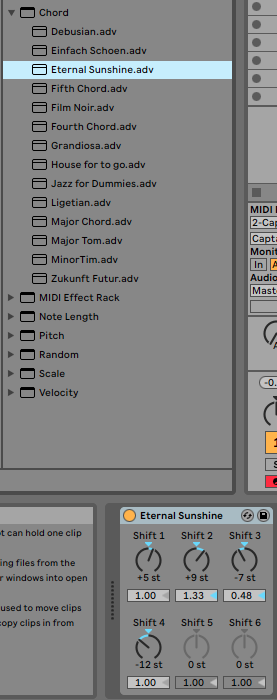
2. Chord
Play a single note, and hear a full chord! There are many plugins that can do this, naturally Captain Chords being our favorite! It’s a handy way of creating chord progressions
quickly, and can offer a fast and inspiring workflow to design better sequences.
Understanding music theory is advantageous, but not a necessity. One of the coolest features of Captain Chords is it not only plays a chord, it helps you find matching chords to
accompany them.
A quick run through of the various Chord options
In basic terms, Ableton’s Chord MIDI effects tool works by interpreting a single note as a predetermined chord, by
transposing up or down in semitones. This note can be a MIDI note on a MIDI Instrument channel, or a note played
live on a MIDI keyboard. With a little planning, you could, for example, tell your MIDI keyboard to interpret all
notes from C2 to B3 as their related major chords, and all notes from C3 to B4 as the related minor chords. So
pressing the note of C2 would play C Major, and C3 would play C Minor.
The Chord tool in Ableton has 16 pre-determined chord types which you can apply to your MIDI notes and generate new
chords.
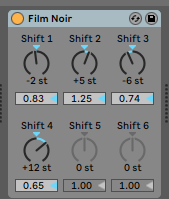
These chord types emulate styles of composition like Jazz, Film Noir and Debusian.
By using these pre-determined chord types you can press a single note and play complex chords, which allows you to
experiment with writing music in new modes, which is bound to spark some interesting new ideas.
We’ve evolved that idea even further with Captain Plugins, by enabling you to experiment with complex chords
and scales, and keep the rest of your track in the right key and scale using Captan Melody, Chords, Play and Deep to
develop your track.
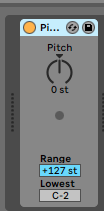
3. Pitch
Drag you MIDI notes up or down in increments of semitone. Such a simple idea, and one that can quickly create really
cool new melodies.
Try letting your MIDI instrument play a pattern, and raise or drop the pitch effect by a few semitones at a time. 12
semitones is a full octave, with each note in between representing one whole note.
Experiment and see if you can make some unusual new patterns!
PRO TIP
Try taking a short, looped melody, and transposing it up to 12 or 24 semitones as it loops through. This has a
really cool ‘climbing the ladder’ effect and can be really effective in build-ups or fills.
Check the video below of this in action
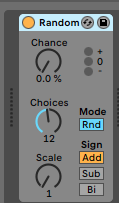
4. Random
As the name implies, the Random tool applies random effects to the pitch of your MIDI notes. The exact parameters can
be adjusted using the simple interface. This tool is all about combinations of settings.
Chance: this is the probability that the incoming note pitch will be changed, by a random amount.
Choices: This is the number of possible notes that could be randomly triggered, from 1 to 24.
Scale: This decides how much scale variation is possible. Scale variation in this context means the octave range
eg a setting of 24 will allow any note to be added from any of 24 full octaves. A setting of 1, in turn, would
mean that only 1 octave is allowed.
Mode: You can select Alt, or Rnd. Alt ensures the randomness parameters alternate, while Rnd tells the
parameters to cycle through in the order they appear.
Add/Sub/Bi: These controls dictate whether notes are randomly added, subtracted or a mixture of the two.
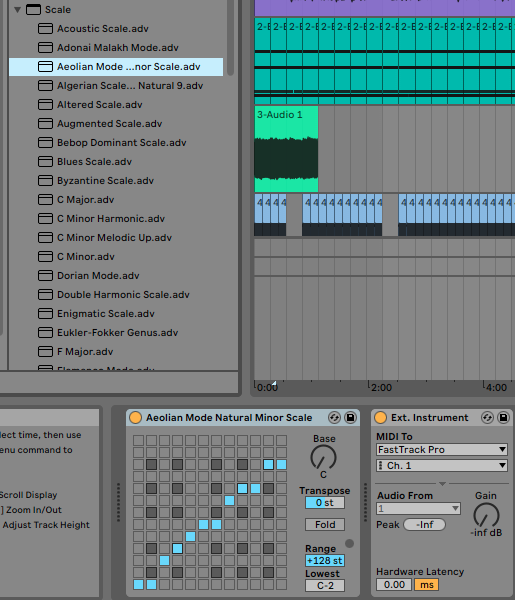
5. Scale
Scale is a tool by which you can transpose your existing MIDI notes to new scales. There are dozens of scales to
choose from, and you can enter your own as well. It’s similar to the Chord tool in that it transforms the function
of your MIDI keyboard. Standardly, your keyboard will play the Western pentatonic scale. By adding Scale, you can
turn that regular scale (C, C Sharp, D all the way through to B) into a new scale, such as Aeolian Minor.
That means that playing the same keys will trigger different notes, depending on the notes in your selected scale.
In addition, you can change the root key, to transpose your selected scale. These effects can all be MIDI mapped to
buttons or knobs for easy scale and key changes.
Captain Play takes this idea and refines it, by simplifying the user interface and
allowing you to create bespoke scale and key combinations in either chords OR single notes.
You can use your computer keyboard or MIDI keyboard to play along in whatever scale or mode you desire!
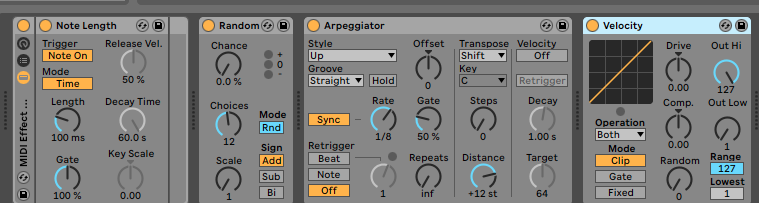
6. Note Length
Note Length controls how fast and how long a MIDI note is played for.
Mode: Choose whether the setting is applied to a set time division, or synced to the DAW master clock.
Gate and Length: Notes can be extended to overlap the next notes, or shortened to tiny blips.
Note On/Off: You can also control whether the Note Length settings are triggered by the note starting, or note
ending.
Release Velocity: When Note Off is selected, this will affect how loud the sound is as it ends.
Decay Time: When Note Off is selected, this will affect how long the sound fades out for.
Key Scale: Key Scale allows the pitch of incoming notes to control how long the outgoing notes play for. With
positive values increasing, notes above C3 will play shorter, while notes below C3 will play longer. Negative
values reverse this.
7. Velocity
Velocity is the force that a sound is played with. So, on a piano, low velocity would equate to a gentle tap of the
keys, while high velocity would be akin to a pianist slamming the keys down with all their might.
Humans, not being robots (at time of writing, anyhow), play musical instruments with constantly varying degrees of
natural velocity. Of course, the very finest players can control their velocity with precision, but even so, the
element of velocity and timing variation is what makes performances sound good.
One of the major limitations with computer-based music has long been an overly robotic performance sound, but this
can be compensated against using Velocity tools in MIDI effects.
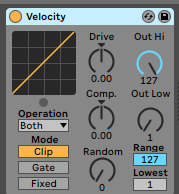
The basic function of the tool is to interpret incoming note values and replay them based on the Velocity settings.
Operation: The function of the Velocity tool. It can either affect Release Velocity, (Attack) Velocity or Both.
Clip: Clips incoming note velocities to stay within the Range settings.
Gate: This function will cut any notes that are outside the selected Range.
Fixed: All notes will be replayed at the Out Hi rate. The only other parameter that can be applied in Fixed mode
is Random, which dictates how much random variation there will be of the Out Hi value.
Random: Randomizes the output volume. The amount of possible variation is shown as a grey band around the volume
marker.
Drive: This is a positive/negative tool, meaning that values below 1 do the reverse of values over 1. Positive
values push the values in the curve to the upper limits while negative values diminish them to the lower limits.
Compand: Another positive/negative tool, this combines the function of a compressor and expander. High values
will play louder than the incoming signal, and negative values will play quieter.
MIDI Effect Rack
These MIDI-controlled effects open up masses of creative options. You can control them by mapping key parameters to
controllers, keyboards or any other MIDI-enabled device. This allows you to manipulate your MIDI instrument in
real-time. The feeling of live control is really addictive, and can yield different results than drawing automation
lanes.
But if you have a multitude of different MIDI effects running, you could quickly run out of knobs on your
controller! Plus, you’ve only got two hands, so can run out of those even quicker!
One really cool thing you can do in most DAWs is create a MIDI Effects rack to control multiple parameters with one
knob. You can map MIDI control of multiple MIDI FX units to as many or as few knobs or buttons as you like. It’s a
real-time saver, and a way to make some super creative sound designs.
Each of these MIDI FX tools is capable of unrecognizably transforming your MIDI instrument. You can transpose the
notes in exotic scales, arpeggiate a chord so fast it’s little more than a flutter, or randomize the velocity of
each note so it sounds like it’s being played by a hyperactive toddler.
With great power, comes great responsibility… and you’ll need to use these tools with discretion if you want to get
the most out of them.
Here’s a short demo of how you can combine MIDI Effects Rack with Captain Chords to transform your sounds
Less is more
Total, random abandon with MIDI FX can quickly become cacophonous. Depending on your project, a little sonic madness
might be desirable, but controlled chaos is key. Experimenting is encouraged, but try and develop a basic
understanding of each tool while using it/ Knowing what you did, what you want to achieve and how to repeat it again
is a handy skill to have.
It can be tempting to fill every spare second with enthusiastic knob-twiddling, but perhaps it’s a good idea to let
the music play sometimes. You risk tiring the listener out otherwise.
Pitch perfection
While many of the effect types we’ve looked at have been destructive, don’t miss out on using others for composition.
Tools like Ableton’s Scale is really cool for pitching notes in new combinations. Modulating pitch, scale or other
tonal quality can generate new and inspiring ideas. It can also help you create music that sounds like it’s played
by a consummate pianist, which is great for those of us lacking in that department!
PRO TIP
Turn your MIDI Instrument into a concert pianist by combining Velocity, Randomization and Note
Repeat/Arpeggiator. Subtle variations in velocity makes the playing sound more human-like, while arpeggios,
pitch modulation and/or repeated notes give the impression of a fast, dynamic performance. Randomize each
function slightly and you’ll be amazed how a simple chord progression can suddenly sound like it’s being riffed
on by John Legend!
Write your own Chords using Captain Chords
It’s super easy to create your own ideas from scratch. Visit the official Chords homepage and see how it will help you explore music and write your own
original productions.