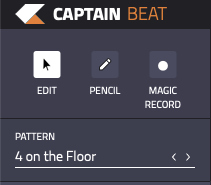
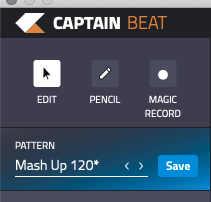
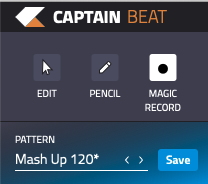
To the top-left corner of the plugin window, there are 3 command types for adding and editing drum notes: Edit, Pencil and Record.
When the Magic Record button is illuminated, you can record drum notes in real-time, by triggering notes to enter them to the canvas.
- Trigger via hot-key. By pressing the appropriate key on your computer keyboard, you can trigger notes. When recording, hot-keys will commit nots to the canvas to match your playing. Hotkeys are signified in the top left-hand corner of each channel berth.
- Trigger via MIDI controller. Simply press a note on your MIDI controller to enter drum hits. *NB you must have ‘Use MIDI input when in Magic Record’ enabled in Settings.
Additional Magic Record functions.

There are several input options available.
- Quantize. Pro-actively quantize your beats to the desired amount. Choose from a range of time divisions and a quantize amount between 0-100. *NB Quantize is not applied destructively.
- Metronome. On/Off at a rate of 1/8.
- Auto-commit. When selected, this will ensure every played note is entered to the canvas. If Auto-commit is deselected, recorded notes will stay greyed out until you click them to commit. To decline recorded notes, press Clear (top-right of screen) or Esc on your computer keyboard.
Fill.

In Captain Plugins 5, Captain Beat has a brand new Fill tool. It is on by default, and replaces the final bar’s beat with a 1-bar drum fill.
There are dozens of Fill patterns to choose from, which can be endlessly customised, just like a regular pattern. To choose a new Fill, you can use the Left/Right cursor to scroll through the menus, or to access the full Fill bank, you can click the Fill name and reveal the long list of styles and authors.

Captain Beat’s Fill tool coms loaded with fills that suit a wide range of genres and styles, including by a host of special guest contributors.
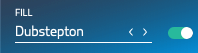
To disable Fill, simply switch the green button off. The fill will disappear and be replaced by the final bar of the selected pattern. If it’s a custom pattern, it will revert to the last displayed version before a fill was added.
Saving a fill.

The option of saving fills becomes available after editing an existing fill, or creating a new fill. Once you’ve made a change, or changes, you can click ‘Save’ (next to Fill name) at any time and save the currently selected fill.
Velocity control.

You can adjust velocity of ndividual notes at any time by expanding the Velocity window at the foot of the plugin, and adjusting note volumes.
Sound design panel.
Basics

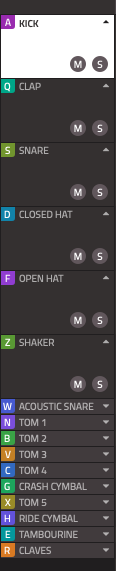
Hotkey.
The displayed letter is the key of your computer keyboard that will trigger the selected sound.Channel.
The selected drum channel.Rhythm.
This displays the selected rhythm pattern on the current channel. You can scroll through patterns using the left/right cursor, or click the rhythm name to reveal the full drop-down menu.Sample.
This displays the selected sample on the current channel. You can scroll through samples using the left/right cursor, or click the rhythm name to reveal the full drop-down menu.“Drop your sample here”.
You can add any sample to the selected channel by dragging it to this box.
Further instructions for adding your own samples:
- Drag files from File Explorer/Finder not your DAW’s sample menu.
- Windows users: drag the sample direct to the channel timeline.
- Mac users: Drag the sample direct to the “Drop your sample here” box.
Controls

Attack.
Increase or decrease the amount of attack. Higher values mean a longer ‘fade-in’ period.Hold.
Increase or decrease the length of time each drum or sample plays through at maximum velocity. Lower values mean shorter peaks.Decay.
Increase or decrease the tail of each drum or sample by +/- 100%. Hgher values mean a longer ‘fade-out’Pitch.
Increase or decrease the pitch of each drum or sample between values of +/-12 semitones.Volume.
Increase or decrease the volume of each drum or sample from 0 – 100%.Pan.
Set the pan position of each drum or sample from left to right in the stereo field.
Effects

Filter.
Central position has no effect. Moving the slider left increases the amount of hi-pass filtration. By contrast, moving it right increases the amount of lo-pass.Reverb Send.
This is a per-channel reverb send with amount between 0-100. The slider is intelligently designed to allow greater precision between 0-50%.Delay Send.
This is a per-channel ping-pong delay send with amount between 0-100. The slider is intelligently designed to allow greater precision between 0-50%.
Export

Choose to export audio or MIDI to your DAW. Simply click and drag your chosen clip to your DAW.
Channel Audio.
Click and drag to render audio from the selected channel to an audio channel in your DAW.Channel MIDI.
Click and drag to render MIDI from the selected channel to a MIDI channel in your DAW.Master Audio.
Click and drag to render audio from the entire pattern to an audio channel in your DAW. The audio is mixed post-FX.Master MIDI.
Click and drag to render MIDI from the entire pattern to a MIDI channel in your DAW.
Selecting Patterns

Click Pattern on the left-hand menu to reveal pattern banks. Patterns are presented by author and sub-divided by genre.
- Use ‘Search’ to search by pattern name.
- Click sub-categories to reveal individual patterns. Each pattern has a suggested bpm value.
Saving a pattern.
Click ‘Save’ (next to pattern name) at any time to save the currently selected pattern. Any current edits will be saved. Choose the name of your pattern, and your Bank location.

Selecting a Drum Kit

Click Drum Kit on the left-hand menu to reveal the preset kits. Kits are sub-divided by type.
- Use ‘Search’ to search by kit name.
- Cycle through the banks of professional-grade drum kits, categorised by style.
Saving a kit.

The option of saving kits is only available with kits you have added sounds to, or created entirely yourself. Once you’ve made a change, or changes, to a kit, you can click ‘Save’ (next to Kit name) at any time and save the currently selected kit.
Master FX and other controls

You can adjust Master filter and volume. You can also decide whether or not the plugin should continue playing audio when the plugin window is closed.
-
Filter is a hi/lo-pass filter that affects the master mix.
Hotkeys
In addition to the hotkeys for each drum channel, there are some additional hotkeys to note:
-
Filter is a hi/lo-pass filter that affects the master mix.
| Hotkeys |
Symbol |
Function |
|
|
1
|
Edit mode
|
|
|
2
|
Pencil mode
|
|
|
3
|
Magic Record mode
|
|
|
Esc
|
Decline Magic Recording (when auto-commit is off)
|
|
|
Backspace
|
Delete selection of notes
|
|
|
Press & hold Alt, then click and drag selection
|
Duplicate selection of notes
|
Shortcuts
Mac
| Function |
|
Shortcut |
|
|
Drag to copy
|
Option + Click + Drag
|
|
|
Undo
|
Command + Z
|
|
|
Move drum note on canvas
|
Left & Right + Up & Down Arrows
|
|
|
Select all
|
Command + A
|
|
|
Delete drum note
|
Select drum note (click or marquee tool) Press Delete or Double Click
|
|
|
Play/Stop
|
Spacebar
|
|
|
New drum note
|
Double click on canvas
|
|
|
Cycle through tools
|
1-3
|
|
|
Drum Hotkeys
|
Z-N, A-H, Q-R
|
|
|
Copy drum note to same position in next measure
|
Command + C / Command + V
|
Windows
| Function |
|
Shortcut |
|
|
Drag to copy
|
Control + Click + Drag
|
|
|
Undo
|
Control + Z
|
|
|
Move drum note on canvas
|
Left & Right + Up & Down Arrows
|
|
|
Select all
|
Control + A
|
|
|
Delete drum note
|
Select drum note (click or marquee tool) Press Delete or Double Click
|
|
|
Play/Stop
|
Spacebar
|
|
|
New drum note
|
Double click on canvas
|
|
|
Cycle through tools
|
1-3
|
|
|
Drum Hotkeys
|
Z-N, A-H, Q-R
|
|
|
Copy/paste drum note
|
Control + C / Control + V
|
MIDI Mapping Captain Beat to external controllers
Set your MIDI controller to trigger the following note values: