Get special upgrade deals!Sign in to see if you qualify for deals.
Your cart is empty
There are no items in your cart
Taxes:Calculated at checkout
Subtotal:$0.00
Keep shopping
You own this software | Purchased on
Included Software:
Get special upgrade deals!Sign in to see if you qualify for deals.
Join Mixed In Key
Please log in again to continue.
Please sign in to view your owned products.
or
Email address
Please enter a valid email address.
By signing in, you consent to receive marketing emails and text messages from Mixed In Key. You may opt out at any time.
To verify your email, we've sent an email to . This code will expire in
You can resend your code in ()
Didn't get a code?
You've entered an invalid code. Please try again
Your code has been resent, check your inbox. If you're having trouble check your junk mail.
Tell us about yourself
Please enter your first name
EQ: The Ultimate ‘How-to Guide’.
EQ stands for Equalization. It’s the process of cutting or boosting frequencies in a mix, in order to improve the way it sounds. In many ways, EQ is a simple balancing act, but beware; mastering the use of EQ is deceptively difficult. There are dozens of misunderstandings that circulate among rookie producers that can lead to all kinds of mistakes.
Adam Hignell delves deep into the world of EQ, to help you avoid these mistakes and learn to use EQ plugins to build professional mixes.
As stated above, EQ is a process of balancing, cutting, or accentuating frequencies in a sound or mix. This article assumes some knowledge of how a DAW works, but, since EQ is one of the fundamental skills a beginner needs to learn, I’ll try to explain all the basic terminology and reasoning behind the principle and process of EQing music on a computer.
More experienced producers or enginers may want to skip to the Advanced section.
Timbres and Frequency.
Frequency.
Sound is vibration. Whether by virtue of your vocal chords, a guitar being plucked or a drum being struck, the sound emitted is caused by vibrations. And it’s not just musical instruments, although of course they have been optimised to create vibrations. Indeed, any sound you can think of is caused by vibrations… the faster the frequency of vibration, the higher the pitch of the sound.
If you’re wondering why this music production site is giving a high school science class right now, it’s because the reason we talk about ‘frequency’ in EQ terms is precisely down to the vibrational frequency any given sound physically emits.
Wait a minute… that makes sense for physically played instruments, but what about synthesizers and digital instruments?
They’re really no different. A hardware synthesizer oscillates its electric current at user-determined frequencies, which can be augmented and affected by all the parameters within the synth’s architecture. And a digital instrument, including inside your DAW, simply emulates this effect with computer code.
So, to recap… the higher the frequency, the higher the pitch.
And this is really important, hence the science lesson. To master using EQ you have to learn where instruments and sounds sit on the frequency spectrum. The spectrum covers the range of human hearing (and a little bit beyond), and is a vital method of visualizing where each sound pitches.
Write Chords Faster with Captain Chords
Use Captain Plugins to write your own Chord Progressions, Hooks, Melodies and Basslines
In a way, the frequency spectrum is like a grand piano – down the bottom are the really low notes, rising to the really high tinkly ones at the top. These frequencies are all measured in Hz – pronounced ‘hurts’. The average human ear can hear sounds from around 20 Hz up to about 20,000Hz (20 KHz), although the sounds at those extremities are inaudible to many, so not much use in music, generally. Having said that, if you’ve ever experienced the sensation of ‘feeling’ the bass in a club, it’s because frequencies down the really low end actually rattle your stomach and rib cage. It’s part of the attraction many of us have to bass-heavy club music and big fat speakers.
Bass
Mids
High
Hz/kHz range
20-40 Hz
40-80 Hz
80-160 Hz
160-300 Hz
300 -600 Hz
600-1200
1200- 2.4 kHz
2.4-5 kHz
5-10 kHz
10-20 kHz
Commonly called
Sub/Deep Bass
Low Bass
Mid Bass
Upper Bass
Lower Midrange
Middle Midrange
Upper Midrange
Presence range
High
Extreme High
Timbres explained.
When different instruments play the exact same notes, they don’t sound exactly the same, right? The reason is that each has its own timbre. And timbres are essentially complexity – the complexity of a sound creates its character.
To get a little more technical, the complexity of a sound is described in terms of partials. Partials are additional frequencies, or tones, that are more or less related to the fundamental tone of the sound. So, when you hear a cello, the richness of the sound comes from all the related partials that are present. These related partials are called harmonics and are kind of like echoes of the original sound in different pitches. When they’re musical sounding partials, it’s because each partial relates to the fundamental by a whole number eg 2:1, 3:1, 4:1 etc.
Conversely, when you hear something atonal like a cymbal, it contains mostly unrelated partials – partials that are unconnected by musical pitch.
We need a basic grasp of timbres and frequencies, in order to understand the sounds we use in our mixes, and where they sit on the frequency spectrum. This knowledge allows us to accurately and intelligently EQ our sounds and mixes, thus bringing out the best in each sound and presenting a clean and clear mix.
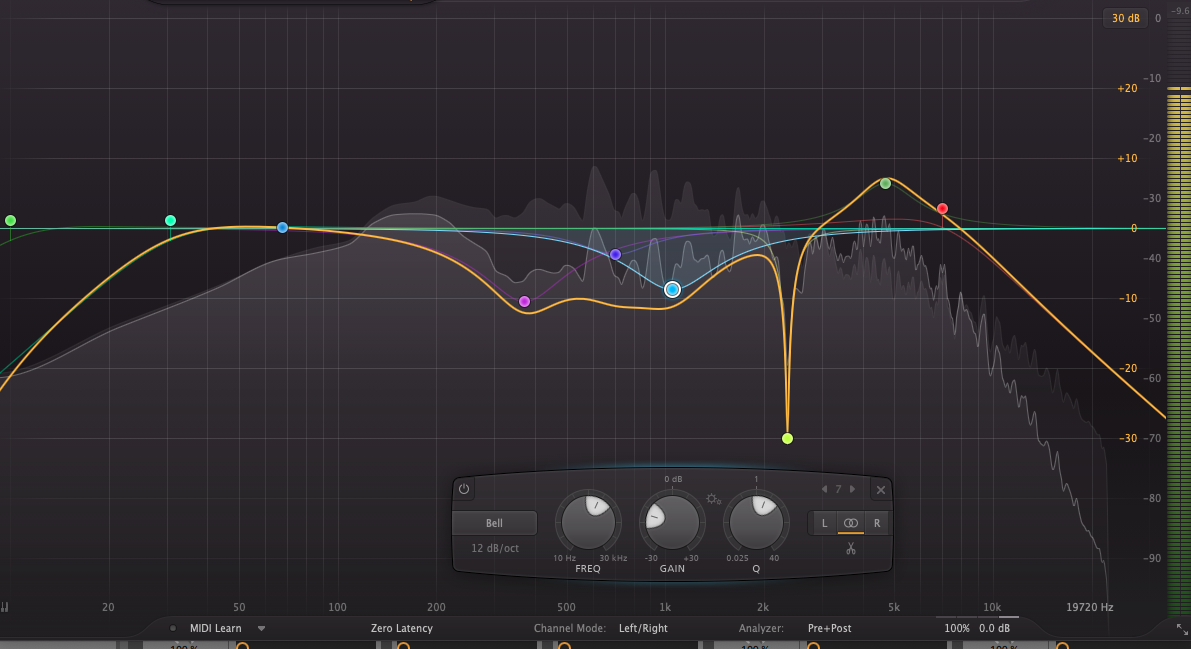
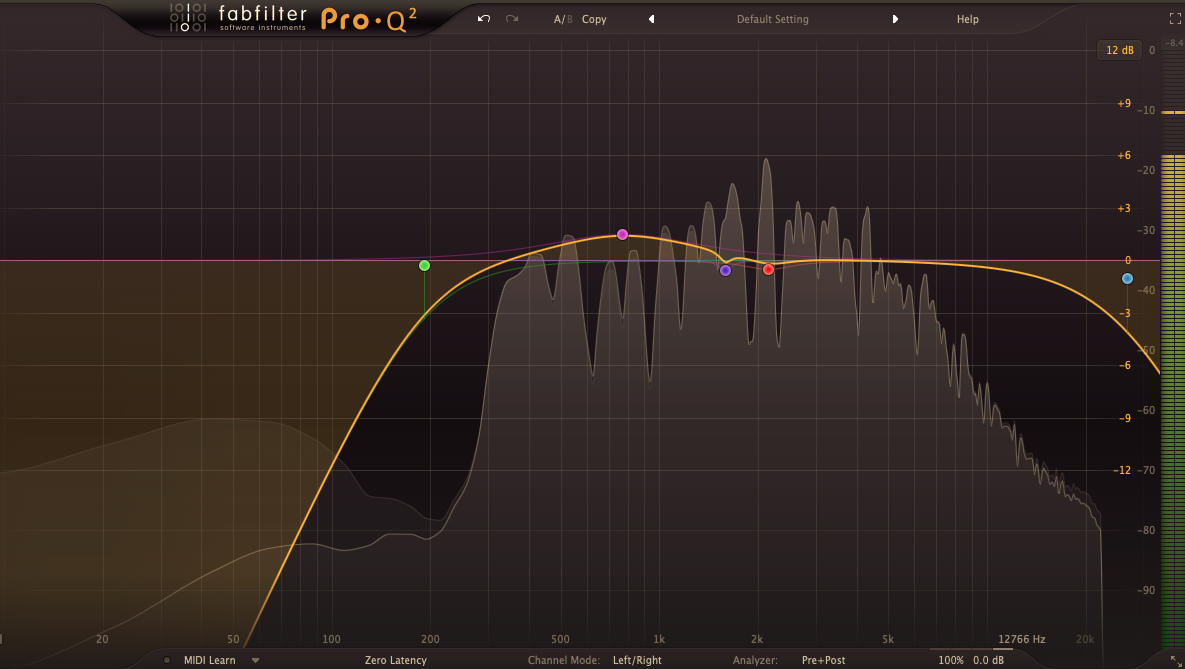
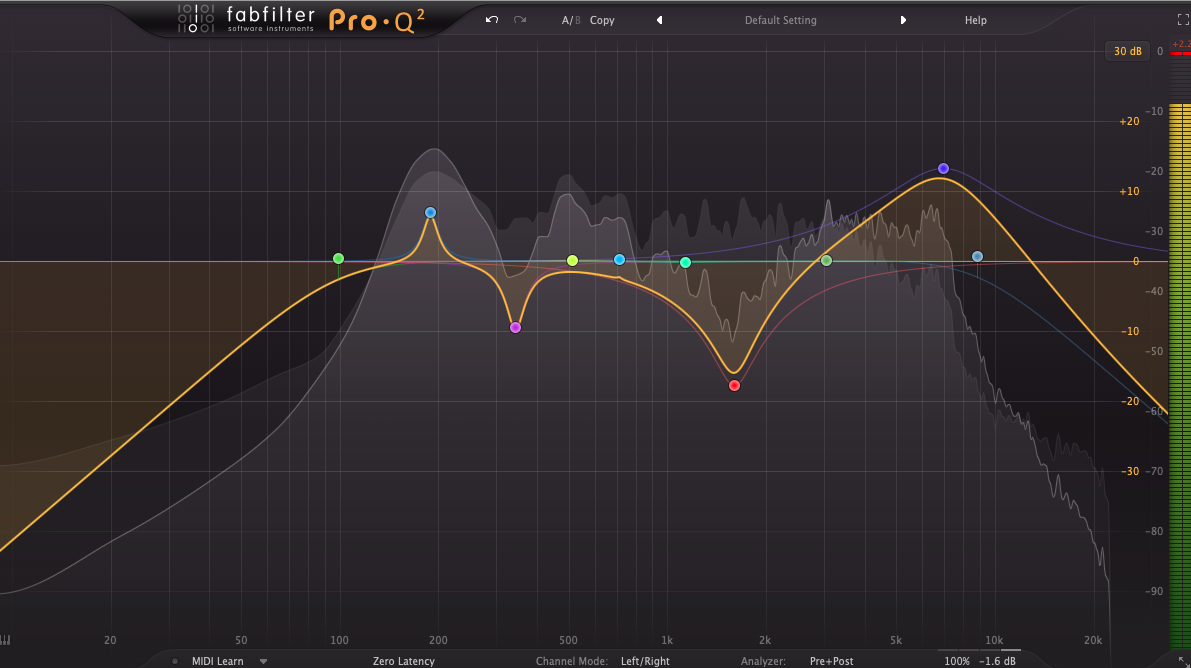
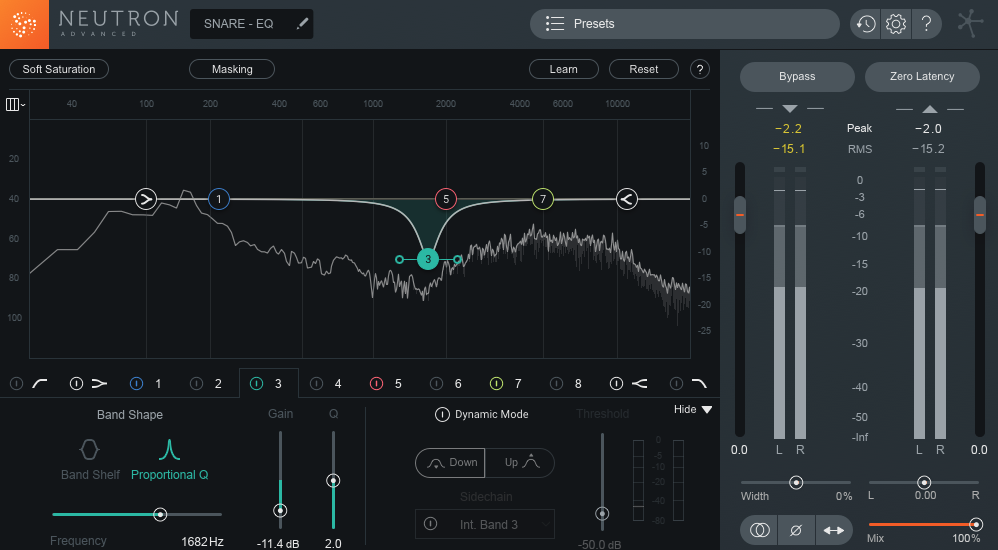
In the above image, the top EQ is for a pad instrument, while the 2nd is for a high string instrument. In order to carve out a little space for the highs in the strings, some gentle scooping of the upper mids and highs in the pad really helps.
Channel strips and sends/busses.
Where should you add EQ in your insert chain?
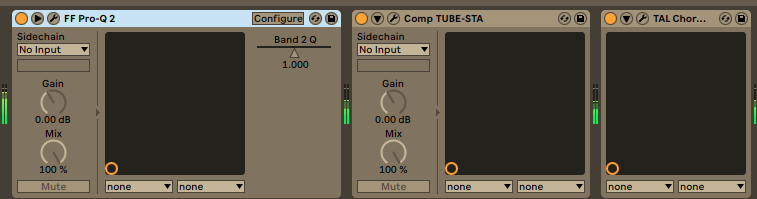
Generally speaking, you should have an EQ on most channels in your project, to clean up or emphasize certain frequencies. But where do you place it in the insert chain? At the beginning, in 99% of cases. The reason being that the following plugins will affect the audio as output from the preceding plugin, so it’s usually a good idea to get the EQ spot on first, and then process it further. EQ is something to be used in conjunction with other effects such as compression and saturation, and while adding an additional EQ further down the chain can be very effective, as a general rule, start every insert chain with an EQ.
Similarly, if EQing a bus channel, apply the same logic.
Terminology/Basic controls.
Jargon buster.
Before we get into more advanced tips on how and why to use EQ in your DAW projects, let’s take a look at some crucial terms that will come up in the remainder of the article…
Sound and frequency:
Frequency Spectrum.
The spectrum of frequencies which any sound can sit in. Sounds can occupy a very narrow frequency range, or a very broad one, depending on the number of partials present.
Fundamental.
The root tone or the sound. Not all sounds have fundamentals, such as white noise. Usually the fundamental, if present, is the loudest pitched frequency spike on the spectrum.
Pitch.
The point at which the fundamental lands on the requency specrum.
Partials.
Additional tones present in the overall sound.
Harmonics.
Partials which are related to the fundamental pitch – usually, in a musical instrument, the harmonics are in-scale.
Inharmonics.
Partials which are not related to the fundamental pitch – therefore not musical or tonal. Think of an explosion or plate smashing.
General EQ controls
(Note that different EQ plugins have more or less of these features):
Filter Frequency.
The frequency position where the currently selected band will be boosted, shelved or passed. Most EQs have at least 3 bands where filter frequency can be set, while some have up to 32!
Boost (AKA Gain).
The amount of the selected frequency that is boosted.
Q amount (AKA Resonance).
The amount (usually in decibels) by which the frequency is boosted, shelved or cut.
Q slope.
When at its maximum, a very wide band which is affected by the configuration. When at it’s minimum, a very narrow band is affected. This is good for surgically removed precise frequencies.
Filter Type.
Some EQs allow you to set different filter types and allocate them at different points of the frequency spectrum.
Filter slope.
The style of the filter.
Filter Slopes:
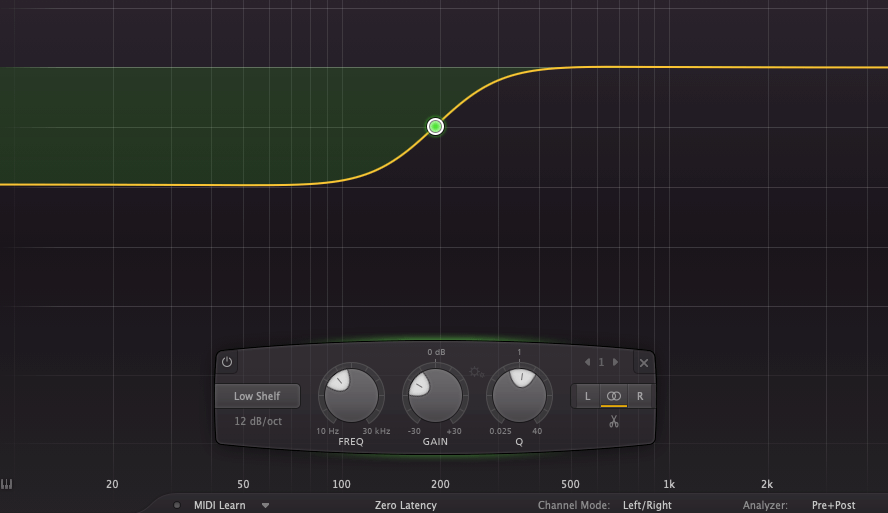
Shelf.
The selected frequency that is shelved i.e reduced in volume in a shelf motion.
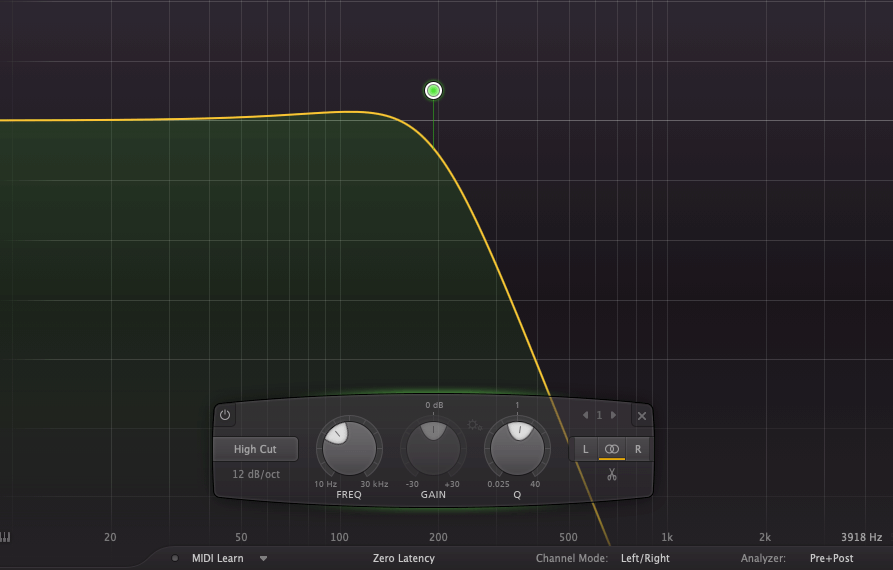
Lo-Pass. Also known as a high-cut filter.
The low end is allowed to stay while higher frequencioes are cut off. the Amount of the cutoff is user-determined.
Hi-Pass. Also known as a low-cut filter.
The high end is allowed to stay while lower frequencioes are cut off. the Amount of the cutoff is user-determined.
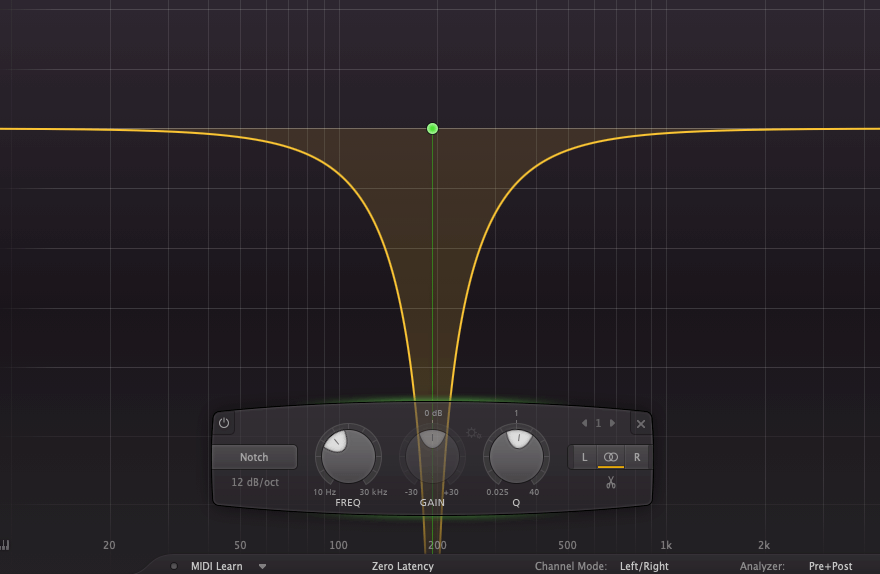
Notch.
The frequency spectrum is cut at a user-determined frequency and Q configuration. It acts as a reverse band-pass filter – instead of cutting all frequencies outside the selected bands, a notch filter cuts all frequencies within the selected band range.
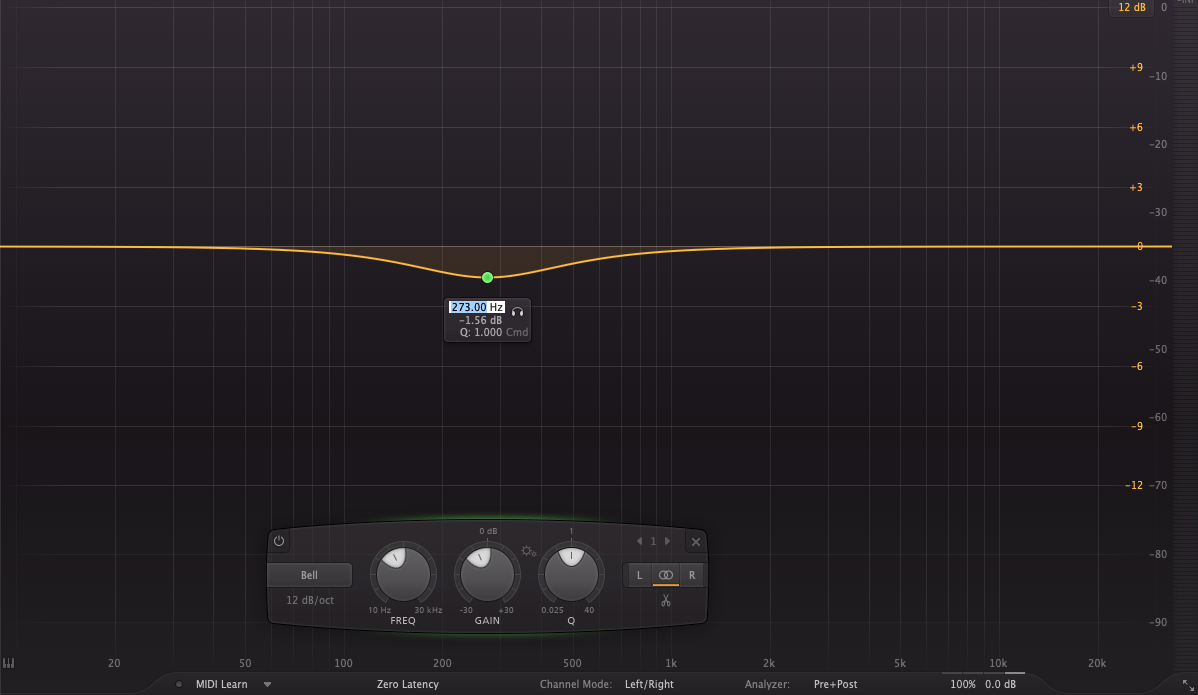
Bell.
The frequency spectrum is cut or boosted at a user-determined frequency, amount and Q configuration, around a central ‘bell’ or peak.
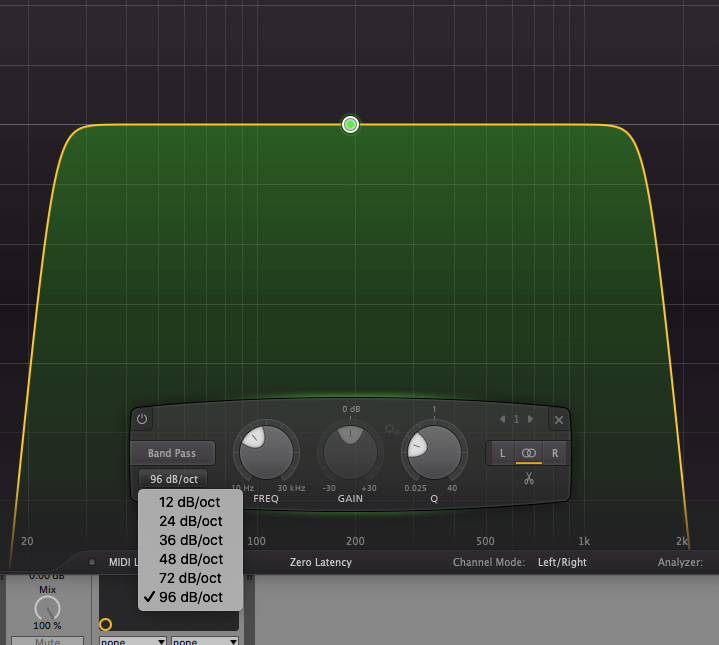
Band Pass.
A combo of lo-pass and hi-pass filters. Frequencies outside of each are cut.
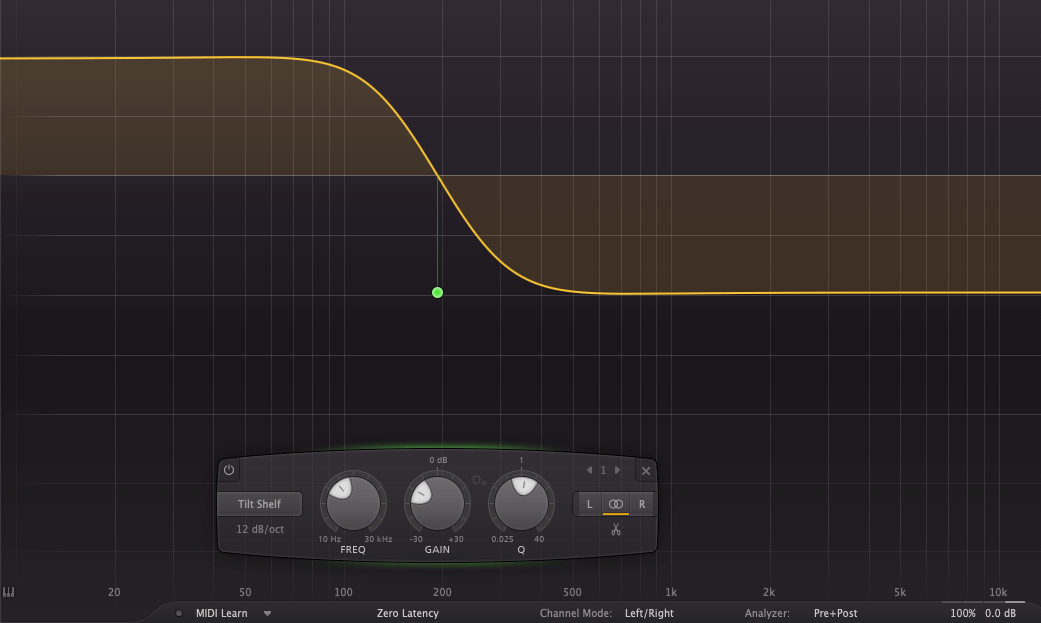
Tilt Shelf.
A much less common style. Used predominantly for tone-sculpting ie adding extra bass and removing highs, or vice versa. The axis of the tilt shelf is where your bass section meets your highs section.
Hi/Lo/Band Pass slope types:
Passing, or cutting, can be applied with different degrees of sharpness. Slope is measured in dB/octave. The higher the number, the steeper the drop off around the corner frequency of the filter. Some EQs offer a choice of either -6db, -12db, -18db or -24db, while others allow the amount to be set by a rotary dial.
A more aggressive cut can be very useful when you only want to hear specific frequencies, but can be problematic if too much of the naturally occuring timbres are lost, which can make things a little sterile.
Why EQ?
There are a few common reasons to apply EQ, which are simple and yet so important that you’ll probably have an EQ on every channel in your projects:
Allowing space for multiple sounds in a mix.
When several sounds occur at the same time, they compete for space on the frequency spectrum of your mix. Why does this matter, I hear you ask? Well, when sounds compete for space in the same areas of the frequency spectrum, the overall effect on the mix is confusion. It can be hard for the listener to separate parts of the mix with their ears, which makes for a woolly, muddy mix.
By cutting, shelving or boosting particular frequencies, we can clear out space in one sound for another sound to make use of.
Consider shelving when clearing space for another sound. A shelf can reduce the volume of part of a sound, without cutting it out completely – this means there’s still some of each sound competing against each other in the mix, but with a shelf on one, it encourages the human ear to focus on the other, while still sounding musical.
Cutting unwanted frequencies.
Consider the sound of an electric guitar. It’s full of all kinds of harmonics, which give it a rich and powerful sound. But, below a certain pint (150 – 200 Hz at a guess) there may be a lot of bassy noise – sounds great on its own, but in a mix, it’s likely to compete with the bass guitar and drums. By adding an EQ and cutting or shelving all the frequencies below a certain range, those lower frequencies disappear or fall back in the mix.
Another reason to cut frequencies is to remove nasty sounding parts of an otherwise good sound. To use the guitar analogy, maybe there is a pocket of nasty sounding resonance around the 2 kHz mark. Scooping it out with a narrow notch or bell EQ might just remove the nastiness while preserving the tone. This is often called ‘surgical’ EQ.
Use narrow cuts. When cutting frequencies, if your EQ curve is wide, you will lose a lot of the musical harmonics – you’ll lose too much of the sound itself. When trying to remove unwanted frequencies, cut with a much narrower EQ curve, so you can remove the frequencies while keeping the rest of the sound intact.
Consider the slope of your pass filters. You may use a hi/lo-pass filter to completely remove frequencies past or before a certain point – for instance a guitar sound has most of its musical frequencies in the mid-range and above, so it’s common to roll off low frequencies that might compete with your bass without adding any musical value. However, beware of using too sharp a slope, as this can cause an unnatural sound, or worse, phasing issues. It’s the same with band-pass filters, incidentally, although sharp slopes on high pass filters generally sound fine.
Boosting or emphasizing desirable frequencies.
You can also emphasize parts of a sound that you want to hear more of, by boosting your EQ in a particular frequency band. For example, a kick drum sound may have plenty of low end, but lacking punch. An EQ boost in the upper-midrange can emphasize the attack of the kick, helping it stand out in the mix.
Other sounds can benefit from boosts in the right places, allowing the sound to stand out better in the mix.
Bus mixes can also sometimes benefit from a boost in the sweet spots to bring out the best tones. It’s also true that mastering engineers make regular use of subtle EQ boosts to bring out particular frequencies. In all cases, the exact frequencies that need a boost depend on the wider context of the mix. But, there are some general rules of thumb to bear in mind:
Use broad boosts. That means, use an EQ curve that is wide, not sharp and targeted. This will generally bring frequencies up in a more natural, musical-soundng way. You can then hone in on any unwanted frequencies and perform surgical EQ to remove them.
Use narrow boosts with extreme caution. Narrow boosts can accentuate the strike point of snare drums, and also the most tonal part of a kick drum’s bass impact. But beware – it has the potential to sound really awful. If you’re not careful, you can create unnatural sounding spikes in the mix, which nobody wants.
PRO TIP
Find the natural peak of your snare or kick drum by looking for a pre-existing spike in the EQ range. It’s usually quite easy to see a snare’s peak, as it has a definite spike somewhere between 100-240Hz.
Bass drums are trickier, and it doesn’t always sound good to boost them. But, some producers swear by it. Bass-drums can have many peaks, since they are usually made up of a single tone and the ensuing harmonics. Find a peak around 165-185Hz and that can often be boosted to bring the kick up in the mix.
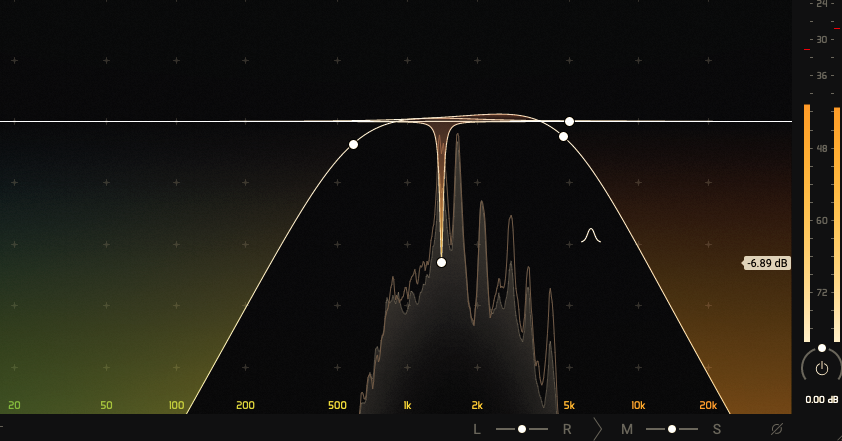
This snare drum’s fundamental is clearly on display – the high peak to the left of the spectrum:
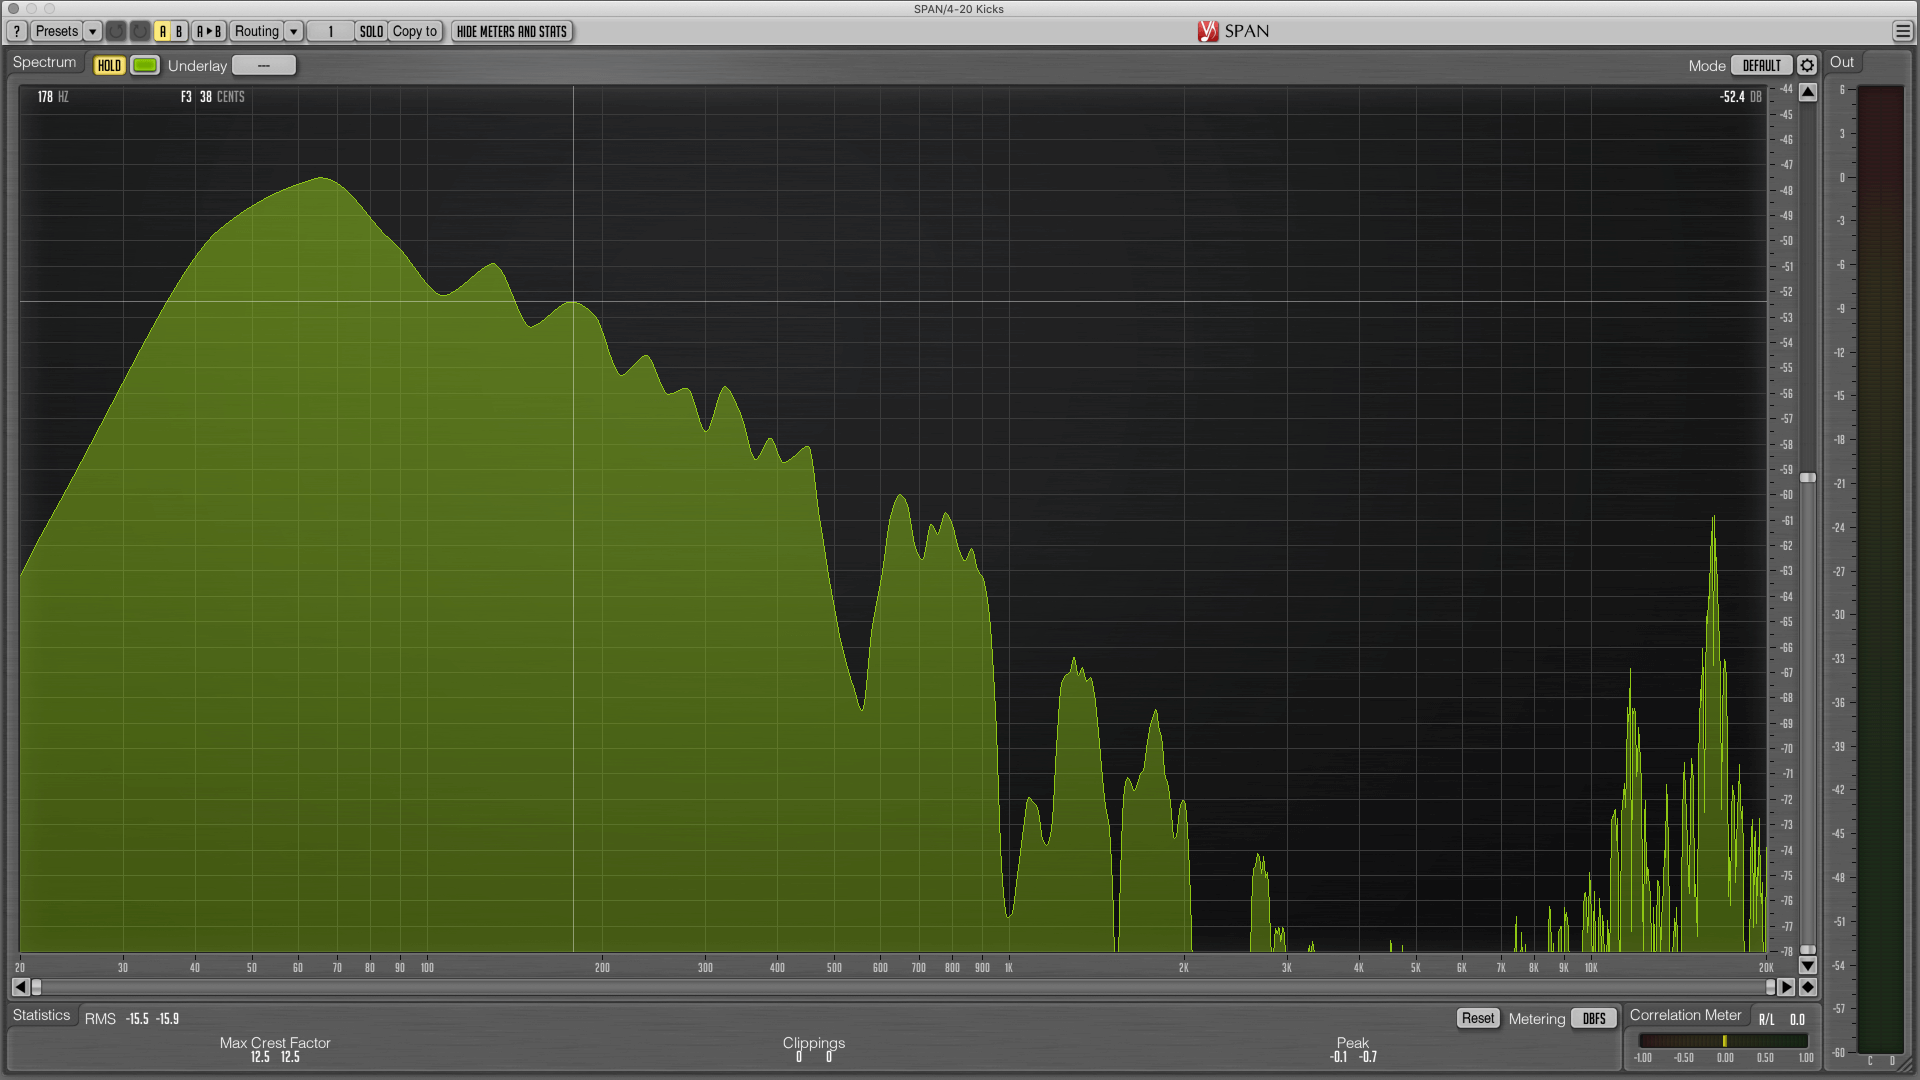
Meanwhile, this bass drum has a much less obvious fundamental, and lots of harmonics:
While there are some more experimental applications of an EQ, these three functions are the mainstays of EQ. And it can scarcely be overstated how crucial they are for all producers and engineers to understand. It is such a core ingredient for a good mix that producers will invariably spend more time on EQ than any other single pursuit. When used well, EQ can make a mix. When used badly, no amount of studio wizardry can save you.
Let’s take a look at some common applications of EQ on a snare and a kick drum:
This classic short 808 kick sample has plenty of low end but lacks punch. I added some high-mid frequencies with a broad bell around 1700 Hz with Waves Solid State Logic EQ.
Can you hear the difference? It’s suddenly got more emphasis on the attack, which means it should cut through the mix a little better.
Now let’s work on the snare:
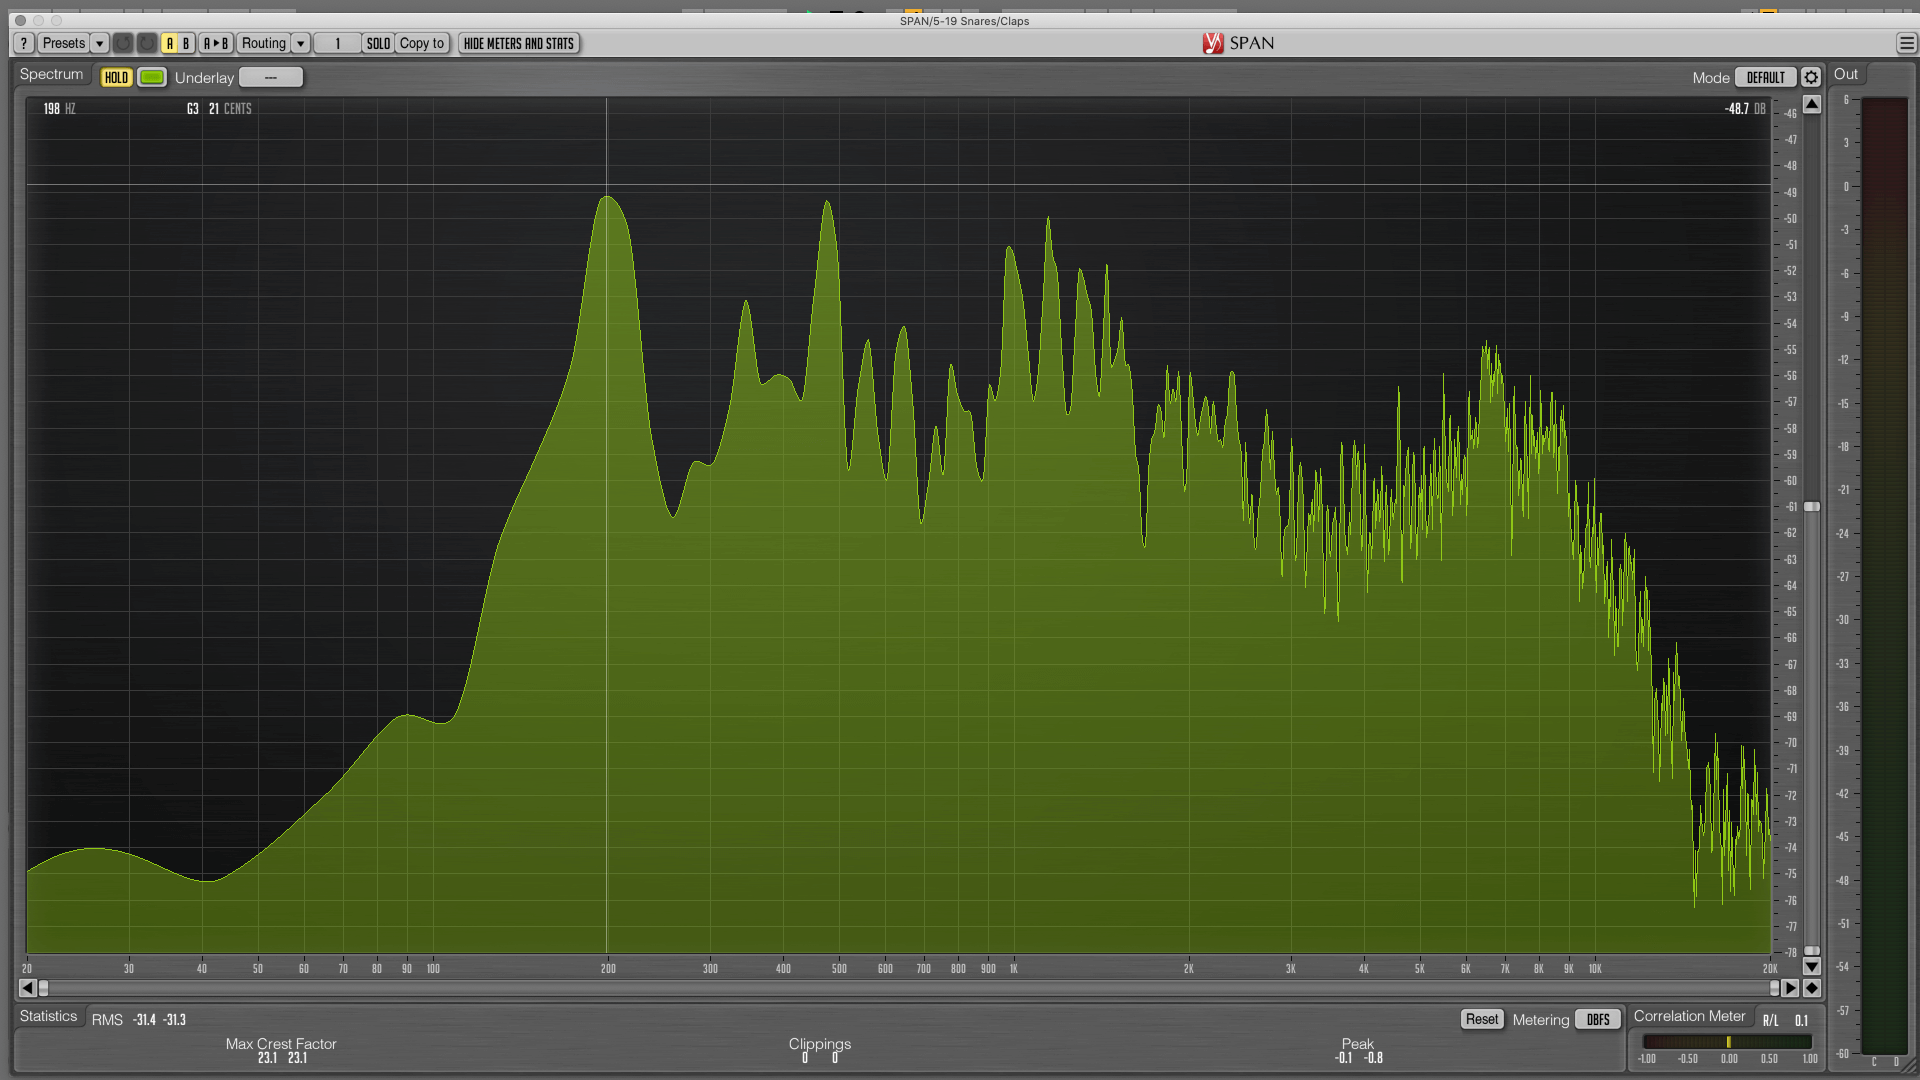
This quirky snare sound from the EMU Drumulator has a huge amount of inharmonics that give it a very full but noisy sound. It would be good to clean it up a bit.
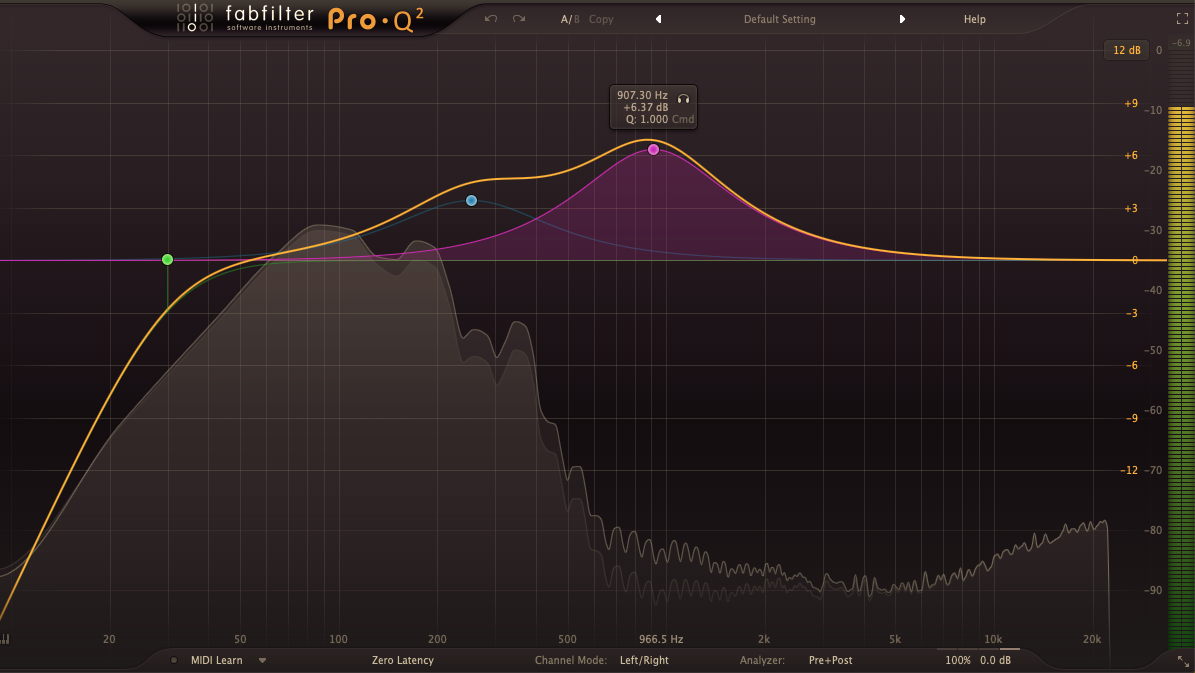
By scooping out around 1600 Hz and a little at about 350 Hz, I can remove some of the tubbyness (not to much lest I lose the character entirely). Then, by boosting the fundamental with a narrow bell, and using a broader bell boost in the upper highs, I can emphasize the punch of the drum, and keep it sounding bright.
There are different types of EQ plugin, which perform slightly different tasks. The most commonly found types are:
Parametric EQ.
The most common. A multi-band EQ, often with a real-time visual display of the frequency specrum (called a spectral analyser). Each EQ band can be boosted or shelved using multiple filter types, with full control of frequency, resonance and gain.
Semi-Parametric EQ.
Similar to a parametric EQ, but usually with one or two fewer features. Usually, the ‘Q’ setting is fixed, so you can only control the frequency and the gain. Often, these EQs don’t have spectral analysers, either.
Dynamic EQ.
A modern, digital style of parametric EQ, which has the added bonus of expansion and compression controls that can be set to respond to the actions of the EQ. The filters react to either the internal audio source or are triggered by a sidechain input source. For example, cuts and boosts respond to the incoming audio that passes a set threshold level. This dynamic movement adapts to the music, making for a potentially more musical EQ.
Graphic EQ.
Pretty old-school. These are the types of EQ you find on old hi-fi equipment, with a preset number of bands at locked freaquency positions and Q amounts. The bands can only be boosted or cut.
Shelving EQ.
Super old-school. Many Shelving EQs also have hi and lo-pass filters. They act similarly to Graphic EQs except the frequency positions of each band can be altered. Also, the filter action is always a shelf (unless it’s the hi/lo-pass).
You may be wondering why you’d ever want to use some of these EQ types, and it’s true that many modern producers solely use Parametric and/or Dynamic EQs. These are the most versatile and fully-featured of EQ types. However, a word for the others… sometimes limitations lead to beauty. A shelving EQ, for example, can add or cut wide sections of the frequency spectrum, which can lead to more musical-sounding results.
Many mastering engneers favor shelving EQs for this exact reason.
Digital vs Analog-emulation.
EQ plugins are either digital style or analog-emulations. Digital EQs are renowned for being ‘clean’. That means they cut or boost at the precise configuration settings, and do not affect the audio fidelity in any noticeable way. While many producers disagree on exactly which digital EQs are cleanest, it’s likely that you wouldn’t hear a difference between the leading digital EQs. Choosing one comes down to workflow preference, affordability or reputation, in most cases.
Analog-emulations are different. They emulate everything about analog outboard EQ units, including the way that they ‘color’ the sound. The electronics of classic outboard EQ units became known for the warm, characteristic way they would affect the sound of the music, which is something many producers still want to achieve. The exact way that these analog EQ units affected the tone of the sound is through adding a small amount of phasing. Now, we might throw our hands up in horror at this thought… “Phasing?! RUN FOR THE HILLS!”
But slow down… small amounts of phasing can sound good. It may be a technical imperfection, but it’s part of that treasured ‘analog warmth’ factor. For those who want to get a little more technical about this; read on…
Linear Phase EQ vs Minimal Phase EQ.
Some digital EQs are known as Linear Phase EQ, while others, and analog-emulations are generally Minimal Phase EQ. Basically, before the dawn of digital, engineers would no doubt have dreamt of the ability to cut frequencies without introducing slight phasing, caused by the circuitry introducing a slight delay between cut and playback. This is known as ‘smearing’, which is a nauseating term, but in small quantities isn’t all that bad.
Then, along came digital, which was able to boast the ability to pre-empt the phasing caused by a cut in EQ and cancel it out entirely. No more smearing!
Notable Linear Phase EQs include Fab-Filter’s Pro-Q and Waves’ Linear Phase EQ. You may conclude, surely, that Linear hase Eqs are ‘better’, right? Well, as with everything in Audio production, the answer is ‘it depends’. While Linear Phase EQs do indeed cancel out smearing, they have two notable drawbacks:
Pros and cons of Linear Phase EQ vs Minimal Phase EQ:
1. The pre-emptive cut and splice action that cancels the smearing can introduce pre-transient pops or spikes, which can sound a nasty on high-transient instruments and drums.
2. The small amounts of smearing caused by classic analog EQ units actually sounds pretty great. Want proof? Hundreds of thousands of hit records were made before the dawn of digital EQ plugins.
Ultimately, there are times when a Linear Phase EQ will sound great – particularly narrow surgical EQ, for example, or EQs on recordings that already have important phase relationships, like drum mics that have characterful bleed from each other already. More phase might spoil the tone. However, it also might sound great – that’s the beauty of this game!
So, then, if you want to know whether to use Linear or Minimal Phase EQs, the answer is – try both and see what sounds best. Which could be the answer to pretty much any audio engineering question!
Let’s move on to the big one:
Dance to the beat of a different drum machine.
Captain Beat 5.0: The Ultra-Modern Beatmaking Plugin
Mix and match rhythm patterns per-channel
Hundreds of high-quality drum sounds
Play and record rhythms with computer keyboard or MIDI controller
EQing is somewhere between an art and a science; it’s effect on sound is so dramatic that using it well can be the difference between a good and a bad mix.
Here are 10 tips to help your mixes:
PRO TIP
The following tips are all as important as each other!
1. Cut more than you boost.
Boosting can be great for many reasons. Using an EQ plugin with a characterful, warm tone to boost broad frequencies can sound wonderful. But, it also runs the risk of introducing artifacts and distortion to the mix. Furthermore, it has the potential to push the channel volume too far and ruin all your careful gain-staging.
By contrast, cutting can carve space for other sounds, remove unwanted frequencies and accentuate the detail in your mix.
Of course, there’s a chance you might remove too much and leave sounds thin or imbalanced. As ever, test different settings and trust your ears.
2. Boost, then cut (or vice versa.)
Whether you’ve boosted or cut first, go back to the sound and decide if you wanted to boost ALL those frequencies… maybe you need to apply a surgical EQ to remove a narrow range of sour frequencies from that sweet boost. Or, perhaps you cut a bunch of muddy frequencies out, but now find the overall sound is a bit thin – maybe boosting low/low-mids here might bring the power back.
3. Try stacking EQs.
Different EQs have subtly different characteristics, so layering different EQ types can have a pleasant effect on the overall tone. For example, rather than aggresively high-shelving with a single plugin, try layering EQ plugins with different characteristics, and applying several softer shelves. Each plugin will shelve in a slightly different way, which can add subtle nuances to the tone of your sound.
Another good reason to use multiple EQs is that, if you’ve nailed your EQ settings but want to add final touches, an additional EQ can work wonders. And sometimes, it just sounds better by chance, which is totally fine!
4. EQ your effects.
Whether on a reverb send or after a distortion plugin in your channel’s insert chain, applying retrospective EQ can work wonders. Taking out low, muddy parts of a reverb can add clarity, while EQing out any nasty frequencies brought in by distortion can be a mix-saver.
You can also add EQ before effects, too. For example, you might only want to send the mid-range through a distortion plugin and keep the lows and highs intact.
4. Find troublesome frequencies with a narrow Q boost.
Any given sound can have sweet-sounding parts and not-so-sweet sounding parts. Very often, it’s particular harmonics or room resonances that cause the problem. When this happens, you’ll want to use a surgical EQ to find and clear them.
Play the sound, while sweeping a Bell filter with a narrow Q up and down the spectrum. Boost it as far as it will go, and nasty frequencies should become very appararent! Once you’ve isolated them, either change the filter type to Notch, or drop the gain by as much as you feel does the job. Et voila, a nice and clean mix!
PRO TIP
There may well be more than one troublesome frequency band in your mix, so keep sweeping until you’ve found them all. Then refer to Tip #2!
Finding nasty frequencies using a sharp Q boost, then reducing gain and using a notch filter.
5. Cut narrow, boost wide.
We’ve already covered this in an earlier part of the article, but for those of you who’ve skipped straight to the Tips section, it’s worth saying again. Narrow cuts remove less of the body of a sound, which is generally desirable. However, narrow boosts often sound unnatural and can cause ugly pops and spiky sounds in your mix. Instead, using a broad boost gives a subtle, evenly spread emphasis to that part of your frequency spectrum.
PRO TIP
Using the technique in Tip #4, find the natural peak of your snare or kick drum by looking for a pre-existing spike in the EQ range. It’s usually quite easy to see a snare’s peak, as it has a dominant spike somewhere between 100-240Hz.
Bass drums are trickier, and it doesn’t always sound good to boost them. But, some producers swear by it. Bass-drums can have many peaks, since they are usually made up of a single tone and the ensuing harmonics or subharmonics. Find a peak around 165-185Hz – that can often be boosted to bring the kick impact up in the mix.
6. Ensemble is king!
Do you want to be EQing every sound individually, to get the very best tone you can at every stage of the mix? Of course you do. But always defer to the ensemble mix as your defining sound. If the sounds don’t sound great together, you’ve still got work to do.
Which brings us onto…
7. Bus mix EQing is your friend.
By EQing the bus mix of a similar sounding group, such as guitars or synths, you can make the sound cohesive while retaining distinction where it counts.
This is where you can carry out extra sculpting, and look at the way each sound group interacts with each other. For instance, say your snare is drowning out your kick when, you could try adding a dynamic EQ onto the snare bus and sidechain it so that it ducks shared frequencies whenever the kick strikes.
You could also consider using automation to give, say, added presence to a vocal during a breakdown, and then reverting to the ensemble mix when the full instrumentation comes back.
Most commonly of all, two groups of instruments sound great on their own but compete when played together. EQ can carve out a little space in one for the other to fill.
8. Mono for reference.
You should be referencing your EQ at regular points, to check on your progress and ward off episodes ‘going down the wormhole’ and losing your way. This is standard behavior for any engineering process.
But, when EQing, if you want to know what’s really happening, switch to mono and listen. Any hase issues will instantly become plain as day. And in any case, mono is everywhere! Cell phones, laptops and tablets all output in mono, as do many radio stations. If your mix doesn’t sound good in mono, it could fall apart when it goes outside your studio.
9. Mono your sub-bass.
Whether bass drum or bass instrument, there’s almost never any value in a stereo signal below about 120 Hz. The human ear can’t distinguish enough of it to recognise anything more than a mono sound at that range, and any phase issues are likely to cause swampy, flappy subs… which nobody wants. Plus, many PA systems designed to playback audio with that much low end are setup to play mono below 120 Hz, so why fight for stereo?
As an added bonus tip, you should almost always keep your low and sub bass in the centre of the stereo field anyway, so mono to be on the safe side.
10. Cut with digital, boost with analog.
Of course, we’re talking analog emulations here, but the point remains. Digital EQs are great for transparent, surgical cuts (among many other things, of course). Meanwhile, analog emulations recreate the characterful quirks that occur when an audio signal runs through hardware tubes and valves. Boosting frequency bands with analog EQs can give warm and rich tones, as if by magic!
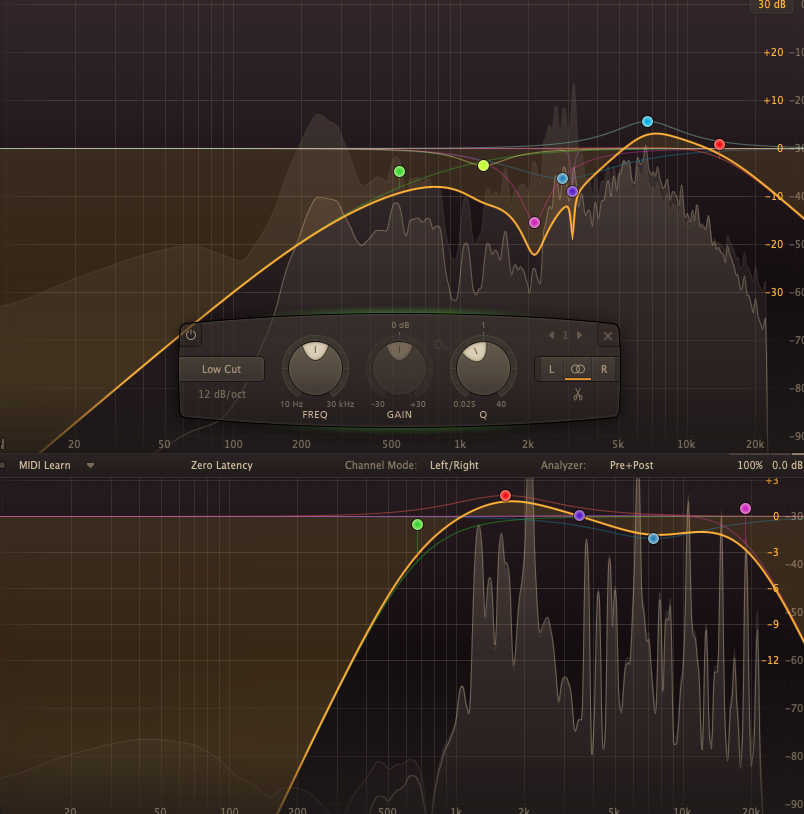
Before we delve into the murky world of common EQ mistakes, here’s an example of EQing that demonstrates a number of the tips listed above:
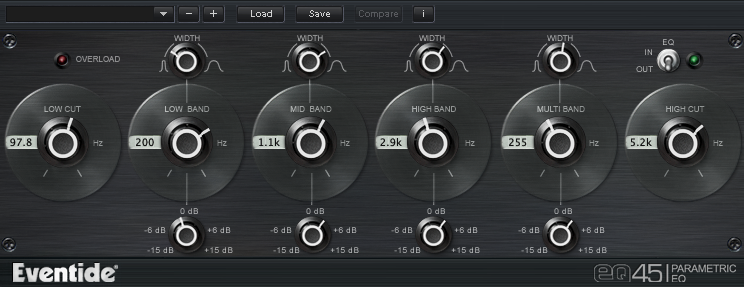
The original sound is an electric guitar riff. It sounds pretty good, but it’s a bit hissy and lacks body.
First, I try an analog-emulating EQ from Eventide, the EQ45, and add some broad boosts and a low-pass filter:
It sounds fatter, the hiss is reduced to an acceptable level, yet there are some nasty sounding harmonics in the low-mids.
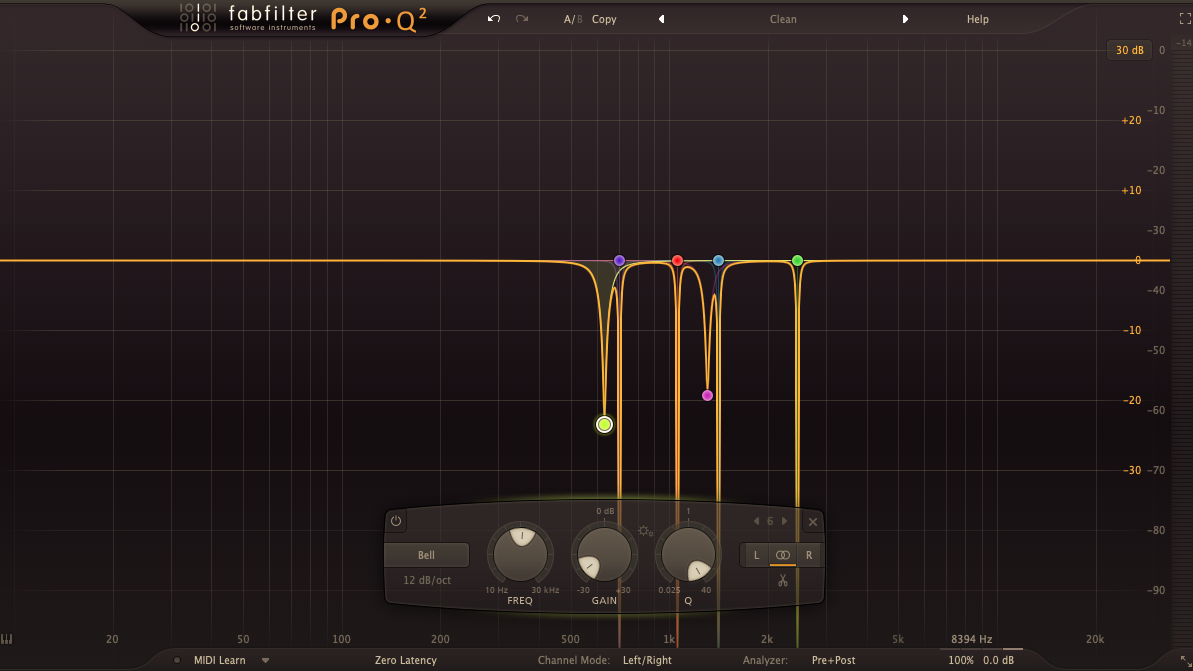
By using a linear phase EQ directly after the EQ45, I notched out the troublesome frequencies. The riff sounds pretty good now.
The following mistakes can lead to poor mixes and yet are unbelievably common! I could condense all 5 into one simple sentence: THINK ABOUT WHAT YOU’RE DOING!
1. Mixing too loud.
Mixing at a million decibels can be pretty thrilling (well, not so much for your neighbors), but while it may feel like you’re immersed in the mix, you’re scientificaly proven to be hearing a reduced frequency range. High frequencies are lost at super high volumes – fact – and you’ll spend time adding highs that were there all along. Not to mention the fact that your ears will tire faster, and potentially be damaged, long-term. We’ve all done it, but please, look after your listening gear.
2. Using tools just because they’re there.
Just because your EQ has 8 bands, doesn’t mean you need to use them all. Just because it has 6 filter types, doesn’t mean you need to use them all, either. It’s great to have options, but it’s easy to feel like you’re EQing better by EQing more. In reality, if you’re not answerng questions that your audio directly poses you, you’ve got a ticket to Mistakeville. Think about every decision you make – never do something because you think you should, or you saw someone on a Youtube video do it. Instead, ask yourself if you can hear a problem, and if you think yur next action has a realistic chance of solving it. And if you don’t know, move on, and come back to it later. It’s much easier to return with fresh ears and make a new decision, than return and try and unpick EQ mistakes made at random.
3. You’re not hearing the right frequencies to start with.
Acoustic treatment.
It doesn’t matter how much talent you have if you can’t hear your audio properly. And my word, is this a common problem. Many producers are happy to spend big on plugins and keyboards, but fail to consider the acoustic environment they’re working in. Very few spaces are naturaly perfect – hard floors, reflective surfaces, bass traps, uneven celings… you name it, there’s a way that your listening space can try and mess with your mixing.
Fortunately, solutions are available for almost all spaces, ranging from the inexpensive (AKA ‘throwing soft furnishings at the problem’) to the specialist (acoustic surveys and bespoke room treatment, mainly). In truth, this issue is one of the most misunderstood in the audio engineering world, and you’ll hear all kinds of crazy suggestions with a cursory Google search (no, egg cartons do not really help). I recommend starting with Sound on Sound’s easy to understand and thorough guide to getting started.
Monitors.
Then, we have to talk about monitoring. While professional studio monitors can cost tens of thousands of dollars, there are plenty of really good options at a raction of that, and plenty in between. Assuming that I’m not addressing readers with a cool $10K to drop on monitors, I’ll simply say that budget monitors do not mean budget results. Some are excellent, such as the popular (yet slightly dull to my ears) KRK Rokit series, Mackie CR-3, Yamaha HS5, and my personal favorite, the ADAM Audio TD-7.
It’s well worth investing what you can afford into studio monitors and acoustic treatment, since this will help you get a true reproduction of the audio you’re trying to EQ. You can’t fix what you can’t hear.
Sub-woofers.
Low end is perennially hard to mix, predominantly because the human ear doesn’t pick it up with the same clarity as it does with mids and highs. Getting them mixed correctly, though, is pretty vital. If the bass and low end doesn’t sit together beautifully and in balance with the rest of the track, it can cause distortion, and in many cases a surprisingly quiet mix.
Again, you can’t mic what you can’t hear, so it’s worth investing in a subwoofer if you can afford it (and your neighbors don’t call the cops). Subwoofers specialise in low range audio (from as low as 20 Hz up to around 140 Hz). I can’t argue with Lifewire’s decision to award the Polk PSW505 with the top spot in this category, and at $300 they’re kind of affordable…
A quick word on mixing with headphones.
When my son was born, my home studio suddenly needed to make a lot less noise, so I invested in a high-end pair of headphone monitors. I’m not saying it was the same as referencing in a properly treated room with decent studio monitors, but I got accustomed to the responses of my new headphones, and was able to mix several commercial records using them, with fairly good results. But, despite having excellent monitors (Sennheiser HD600s, if you’re curious) I couldn’t in all honesty recommend headphones for mixing/EQing in full. I’d always want to do my final mixes in my studio. However, good headphones can come pretty close if you learn their limitations, and can be a really great solution for those living in quiet spaces.
4. Over-reliance on spectral analysers.
It’s pretty handy having access to a highly detailed image of your sounds’ frequency performances. Spectral analysers are awesome. But, your ears are awesom-er. Trust them, learn to really listen with them, and you’ll make better EQ decisions. One good way to practice this, is to use shelving EQs or analog emulations to perform EQ processes. By taking away that spectral analysis crutch, you’ll force your ears to listen, which can only make you a better mixer.
5. Too much bass.
Everyone loves bass. It’s the special sauce that gets the party started and the club jumping. But most us have a tendency to overload the bass in search of that bass-bin bothering magic.
You’re leaving a load of mud in your sounds.
Many sounds have a fundamental and a bunch of higher harmonics that round out the sound and provide its character. But below the fundamental, it’s often just bassy tones that fight with your bass instruments. Roll them off on almost every track below the fundamental, and you should find a great deal of space opens up in the low end for clear, powerful bass-lines and drums.
You think more bass = better track.
The strange thing is, oftentimes removing bass can actually bring out sparkly mids and highs and emphasise the bass you left in. Knowing how much to leave in is one of the dark arts, but so long as you’re not just whacking more in when in doubt, you’ve a good chance of nailing it.
EQ as a creative tool.
While EQ is most commonly used as a cleaning or emphasizing tool, there are some pretty cool ways EQ can be used creatively.
Modulating a sound.
By combining EQ with an LFO, it’s possible to come up with some incredible modulations that change the character and sound of an instrument. Take the classic dubstep wobble sound. One way of achieving this is to modulate the EQ of a bass sound by applyng an LFO. Setting the LFO to change the point at which the higher frequencies are cut from the channel (AKA the ‘cutoff’) makes the bass sound appear to ‘wobble’ as it modulates. Telling the LFO to modulate in a particular rhythm is a classic technique in lots of dance and pop music.
You can actually combine EQ with other modulation sources, too. For instance, you could set a notch filter to cycle through a wide frequency spectrum. As the sound plays back, you’ll hear a kind of rippling/combing effect, which can be pleasantly textural.
PRO TIP
Try modulating your EQ after a Reverb or Delay plugin for some wild sonic possibilities. Simply apply automation to sweep, shelve or notch in a rhythmic pattern on your Reverb or Delay Send. It’s not a commonly used technique but can sound really cool.
Listen to how adding LFO controlled Low-pass filtering transforms the performance of the synth.
Filter sweeps.
We’ve all heard this technique in countless club hits. By automating lo/hi-pass filters, producers can cause absolute scenes on the dancefloor. As a filter sweeps down, the tension mounts. It feels like something is happening… then as it sweeps back up, the tension gives way to excitement, the dancefloor anticipates the drop and then BANG! Pandemonium in the club. Fun, right? And so easy to do.
In this example, a track I’m working on uses a classic filter sweep on the piano to build tension in the drop.
Match EQ.
Some EQ plugins, such as Izotope Ozone and even Logic Pro X’s built in EQ range, have Match EQ features. This means they can analyse an incoming source, gauge the overall EQ balance, and apply that balance to the sound or mix you’re working on. It’s a great way to access professional mix EQs and see if they work for your mix.