Get special upgrade deals!Sign in to see if you qualify for deals.
Your cart is empty
There are no items in your cart
Taxes:Calculated at checkout
Subtotal:$0.00
Keep shopping
You own this software | Purchased on
Included Software:
Get special upgrade deals!Sign in to see if you qualify for deals.
Join Mixed In Key
Please log in again to continue.
Please sign in to view your owned products.
or
Email address
Please enter a valid email address.
By signing in, you consent to receive marketing emails and text messages from Mixed In Key. You may opt out at any time.
To verify your email, we've sent an email to . This code will expire in
You can resend your code in ()
Didn't get a code?
You've entered an invalid code. Please try again
Your code has been resent, check your inbox. If you're having trouble check your junk mail.
Tell us about yourself
Please enter your first name
How to use MIDI FX with Logic Pro X
Maximize your MIDI with our handy guide. We’ll take a look at Logic’s MIDI FX units and how to use them.
What is MIDI FX?
MIDI FX (effects) tools come as standard with most DAWs, and offer a whole range of ways to shape the output of MIDI
Instruments.
MIDI is the current standard method of sending musical data between devices. This can be in the form of a keyboard
‘talking’ to a piece of software to generate notes, or a controller turning its knob to change a parameter on
another device, or piece of software. It can transmit information between hardware and software equally.
When we talk about using MIDI FX, we’re describing ways to control a MIDI instrument using the MIDI Effects tools
within your DAW, such as Logic Pro X or Ableton. Different DAWs have different tools, meaning some functions are
unique to certain DAWs, while most share at least a few generic effects tools.
There are 9 MIDI Effect tools in Logic Pro X. Let’s take a look at what they do, and how to use them
The first thing to understand, when using MIDI FX in Logic, is that they are applied on the MIDI FX panel, above the
MIDI Instrument and Audio Effects panels on the MIDI channel strip.
You can stack as many MIDI FX tools as you wish.
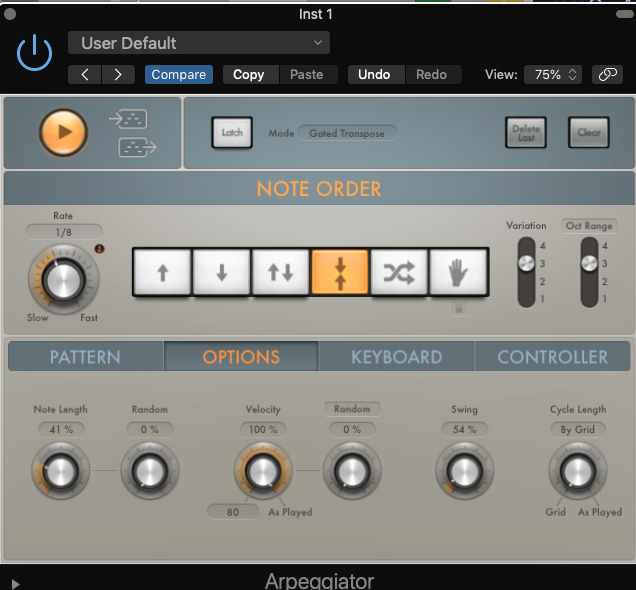
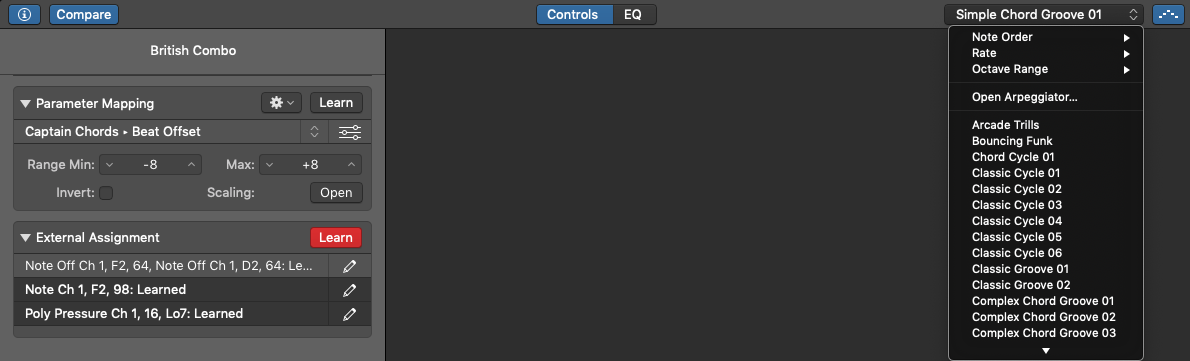
1. Arpeggiator
Arpeggios are a classic tool to create energy in a melodic line. The Arpeggiator tool in Logic is a powerful,
multi-dimensional tool that can transform any MIDI clip in myriad ways.
It works by re-triggering the current MIDI note, and playing the notes of its root chord in individual, sequenced
notes.
You can control how fast it re-triggers, how long each note should last, and many more parameters. You can also
instruct the pitch to increase or decrease in increments – often octaves – or play all the notes in a designated
scale.
It’s an incredibly powerful tool that can be heard in countless songs across the ages.
Let’s investigate the Logic Arpeggiator’s main functions
Play
Start playback of the Arpeggiator. Playback is tied to the DAW timeline, and will start as soon as you add the
Arpeggiator as MIDI FX. Pressing the Play button while the Arpeggiator is running while stop the Arpeggiator. This
reverts the MIDI signal to its pre-Arpeggiator behaviour.
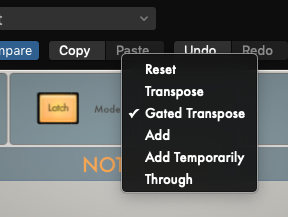
Latch
The Latch function is similar to the Hold function in Ableton, and replicates a feature of many hardware synthesizer
arpeggiators. If you are triggering the Arpeggiator with your MIDI keyboard, the arpeggio will stop being triggered
when you let go of the keys. With Latch enabled, the arpeggio will continue until it is told to either stop, or
change. There are several Latch settings which determine how the ‘stuck’ arpeggio will behave:
Reset: The first key played clears the currently latched notes.
Transpose: Play a single key to transpose the arpeggio relative to the note value of the pressed key and the
lowest arpeggiated note.
Note: Pressing more than one key simultaneously clears currently latched notes and starts a new arpeggio.
Gated Transpose: This option is the same as Transpose Latch mode with the difference that the arpeggio only
plays while a key is pressed. As soon as the key is released, the arpeggio is muted.
Add: Play keys—one by one, or simultaneously as a chord—to add them to the latched arpeggio. You can play the
same key multiple times and the note repeats the number of times it is struck.
Add Temporarily: This option is the same as Add Latch mode except that played notes are added to the latched
arpeggio only while held. When a temporarily added key is released, it is removed from the arpeggio.
Thru: All incoming MIDI notes are passed through the Arpeggiator plug-in, enabling you to play along with a
latched arpeggio.
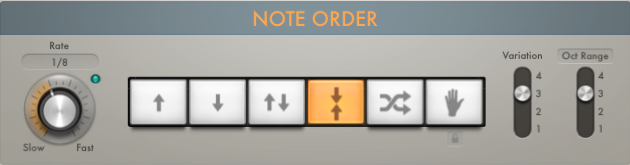
Rate
This setting can be any division of the DAW’s tempo from 1/1 to 1/128, with triplets also included. Swing can later
be applied in Options.
Note Order
This is a complex setting with several permutations per setting. The default note order occurs when the Oct Range
button top the far right of the screen is at 1.
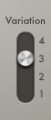
Variation
Increasing the Variation triggers different versions of the default note order.
Up
1. Plays the original chord, then three inversions in consecutive order and restarts. Playback order: original,
1, 2, 3.
2.Plays the second inversion first. Playback order: 1, original, 2, 3.
3. Plays the third inversion first. Playback order: 2, original, 1, 3.
4. This variation, which consists of three steps, plays up and overlaps. Playback order: original, 2, 1, 3.
Down
1. Plays the original chord, then three inversions in consecutive order and restarts. Playback order: 3, 2, 1,
original.
2. Plays the second step first. Playback order: 2, 3, 1, original.
3. Plays the third step first. Playback order: 1, 3, 2, original.
4. This variation, which consists of three steps, plays down and overlaps. Playback order: 3, 1, 2, original.
Up Down
1. Plays the original chord, then three inversions in consecutive order, then reverses the order, repeating the
first and last. Playback order: original, 1, 2, 3, 3, 2, 1, original.
2. Plays the second step first. Playback order: 1, original, 3, 2, 2, 3, original, 1.
3. Once the pattern is played, the order is reversed, then the arpeggio restarts. Playback order: original, 2,
1, 3, 3, 1, 2, original.
4. Once the pattern is played, the order is reversed, but the third inversion is not repeated. Playback order:
original, 1, 2, 3, 2, 1.
Outside In
1. Plays the highest inversion, then the original, then plays the second highest and the second lowest
inversion, and so on. Playback order: 3, original, 2, 1.
2. Plays the original, then the highest inversion, then plays the second lowest and the second highest
inversion, and so on. Playback order: original, 3, 1, 2.
3. This is an inside-out variation. Playback order: 1, 2, original, 3.
4. This is an inside-out variation. Playback order: 2, 1, 3, original.
Random
1. Played inversion order is randomly generated and can include duplicate chord inversions.
2. Played inversion order is randomly generated but no chord inversion is played twice.
3. This variation favors low chord inversions. Played inversion order is randomly generated and can include
duplicate chord inversions.
4. This variation favors high chord inversions. Played inversion order is randomly generated and can include
duplicate chord inversions.
As played
1. Plays all notes in the order they were played, then restarts.
2. Plays all notes in the reverse order they were played, then restarts.
3. Plays all notes in the order they were played, then plays notes in reverse order, doubling the first and last
played notes. The arpeggio restarts once all notes are played.
4. Plays all notes in the order they were played, then plays notes in reverse order, but does not repeat the
first and last played notes. The arpeggio restarts once all notes are played.
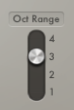
Oct Range
The Oct Range button increases the range of octaves the arpeggio can cycle through. The result depends on the
combination of Note Order and Variation settings.
Pattern
Clicking Pattern reveals a 16-step grid, which can be manually edited to alter the cycle of the arpeggio.Existing
Note Order settings are adhered to, but the length and volume of steps, and the total number of steps, can be edited
here by dragging steps up, down, side to side or adding/deleting them.
Options
This section allows the expressivity of Swing, Velocity, Note Length and Randomness influence your arpeggio.
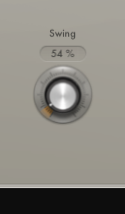
Swing
You can edit the Swing from perfectly on the beat to wildly swung rhythms.
The greater the Random setting, the greater randomness between the parameter from 0 to the Swing knob’s current
level.
Velocity
At 80%, Velocity is set at exactly the level of the incoming signal. Reducing this amount softens the velocity,
rendering playback exponentially quieter. Meanwhile increasing this adds aggressiveness to the velocity level. It is
possible to alter the percentage of Velocity that corresponds to the incoming signal level
The greater the Random setting, the greater randomness between the parameter from 0 to the Velocity knob’s current
level. This can be applied to give the arpeggio a more human-like performance style but allowing random, human
fluctuation between note strikes.
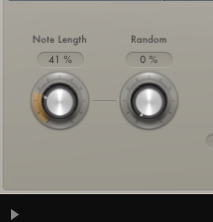
Note Length
Note Length acts like a Gate. 100% will leave the note as played, while reducing the ratio cuts the note in
increasingly short divisions
The greater the Random setting, the greater randomness between the parameter from 0 to the Note Length knob’s current
level.
Cycle Length
100% will tell the cycle to play back entirely as played by the MIDI note input, while a reading of 0 ensures it
plays back strictly as per the Grid. Blending the ratio allows more or less human interference in the way the
arpeggio plays through.
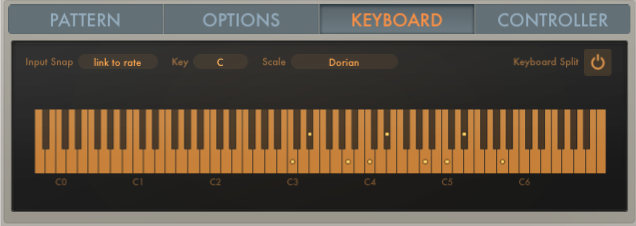
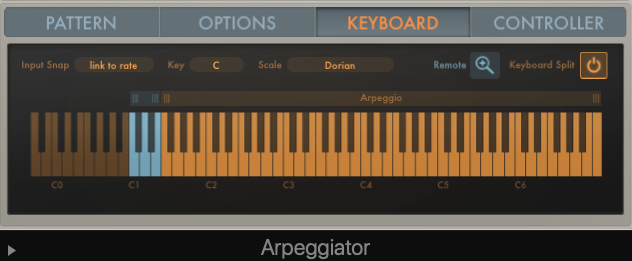
Keyboard
The Keyboard window is where you can go to customize the performance of certain notes or groups of notes on your
MIDI keyboard in relation to the Arpeggiator.
For example, you can tell certain keys to trigger arpeggios, while others play regular notes. You can set certain
keys to trigger arpeggio transposition, so, as per the image above, all notes selected trigger transposition to the
C Dorian scale.
You could also tell the various octaves (C0 through to C6, above) to, instead of playing their different octaves,
play arpeggios at different rates.. C0 could be told to play the note C4 at 1/8 Rate, C1 would play C4 at 1/16, C2
at 1/32 and so on.
Single
By default, triggering a single note inside the blue Trigger Keys area will play it’s equivalent 4-note chord. So,
play the note C3, and the Chord of C Major will be automatically triggered.
Multi
In Multi mode, you can teach Chord Trigger the chords you want to trigger, and with which keys to trigger them.
It works like this:
Step 1. Set mode to Multi
Step 2. Press Clear to remove any old settings.
Step 3. Press Learn. Chord Trigger is now waiting for your input.
Step 4. Click on a single note of your choice – this is the note which will become your custom chord trigger.
Step 5. Play a chord of your choice eg C-E-G (or something fiendishly tricky). The note you assigned will now
play C Major when you press it.
Since this is already possible in Single mode, a lot of producers use Multi mode to ‘cheat’ playing more complex
chords with one finger!
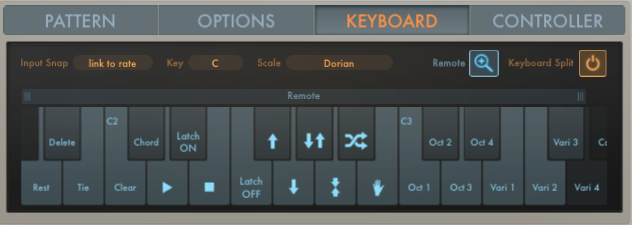
Keyboard Split
You can also split the keyboard, so certain groups of notes play through the Arpeggiator, while others bypass it, as
above.
This can be taken further by applying Arpeggiator control functions to the keys that aren’t directly tasked with
playing the Arpeggiator. So, notes C0 to B1 could be given tasks such as Arpeggiator Rate Up, Rate Down, Latch
On/Off etc. These transport controls will affect the arpeggiated notes played simultaneously on the keyboard.
There are an almost endless array of ways to customize your MIDI keyboard with Logic’s Arpeggiator. It’s designed
for live performance, but it can be really useful in the studio too.
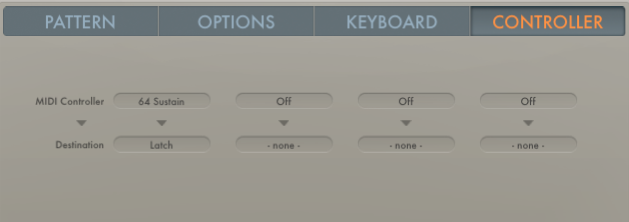
Controller
You can control many of the Arpeggiator settings with a MIDI controller. It’s a simple way of enabling easy access to
your favorite features.
The MIDI Controller row enables you to select the control device, such as a button, slider or key. Destination is
where you set the function of the MIDI control device.
Using Arpeggiator with Captain Plugins
Insert Captain Chords, Melody or Deep as a MIDI FX plugin on a Software Instrument or External Instrument channel. Do
NOT insert Captain as an Audio Unit.
Then, add a second MIDI FX Unit and select Arpeggiator from the menu. Voila! Your compositions in Captain are
instantly processed by the Arpeggiator.
This is even cooler than using MIDI clips, as you can alter your chords, melody or bassline in real-time as the
Arpeggiator plays!
Using Captan Plugins with Arpeggiator and a 3rd party synth in the same channel.
You can also route Captain Plugins’ MIDI output to another synthesizer and still use the Arpeggiator. Even better,
it can all be done on the same MIDI channel! Simply follow the steps above to load Captain Plugins and an
Arpeggiator as MIDI FX plugins, and then add your choice of synth to your Software or External Instrument channel.
No complex routing required!
2. Chord
Play a single note, and hear a full chord! There are many plugins that can do this, naturally Captain Chords being
our favorite! It’s a handy way of creating chord progressions quickly, and can offer a fast and inspiring workflow
to design better sequences. Understanding music theory is advantageous, but not a necessity. One of the coolest
features of Captain Chords is it not only plays a chord, it helps you find matching chords to
accompany them!
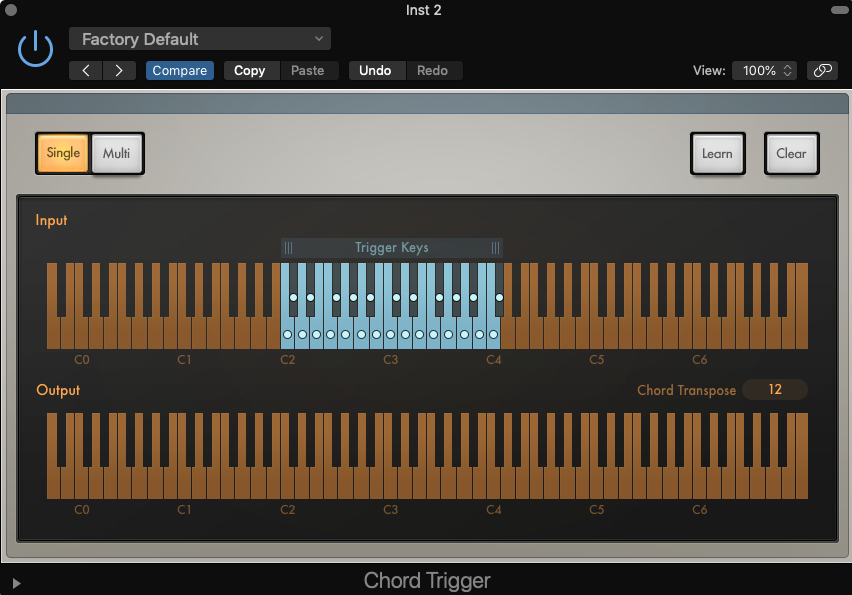
In basic terms, the Logic Chord Trigger tool works by interpreting a single note as a predetermined chord. This note
can be a MIDI note on a MIDI Instrument channel, or a note played live on a Logic’s Chord Trigger makes a visual use
of a 61-key keyboard so you can see what chord is being triggered by which key.
Alternatively, it can receive multiple notes from your MIDI keyboard or channel and trigger bespoke chords in their
place.
How to use Chord Trigger
The top row of keys is the keys you will actually play, and the bottom shows the chords that are subsequently
generated.
The blue area marked ‘Trigger Keys’ has three vertical lines on either edge of the selection area. These can be
dragged to create new Trigger areas. The selected Trigger areas will trigger as per the rest of the plugin settings.
Single
By default, triggering a single note inside the blue Trigger Keys area will play it’s equivalent 4-note chord. So,
play the note C3, and the Chord of C Major will be automatically triggered.
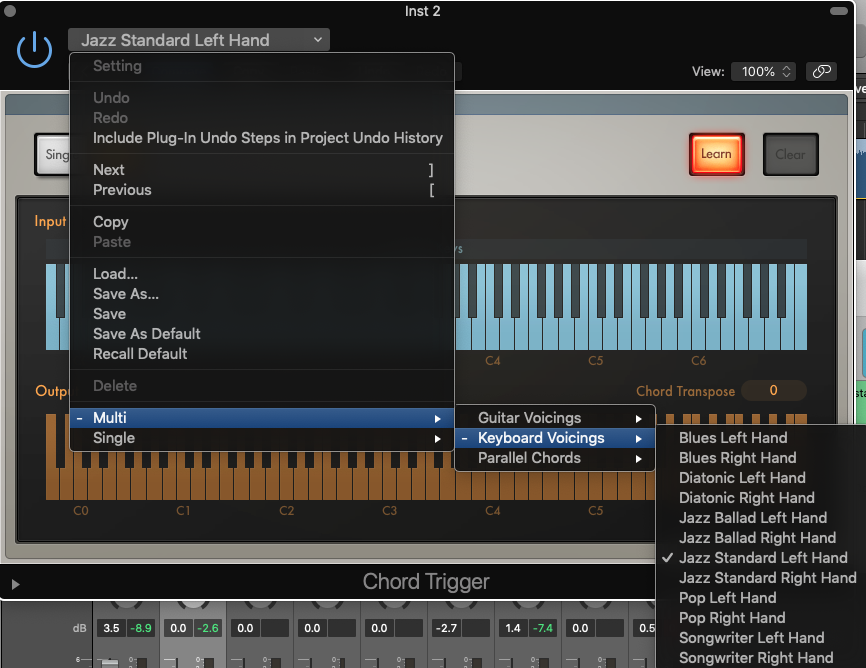
Multi
In Multi mode, you can teach Chord Trigger the chords you want to trigger, and with which keys to trigger them.
It works like this:
Step 1. Set mode to Multi
Step 2. Press Clear to remove any old settings.
Step 3. Press Learn. Chord Trigger is now waiting for your input.
Step 4. Click on a single note of your choice – this is the note which will become your custom chord trigger.
Step 5. Play a chord of your choice eg C-E-G (or something fiendishly tricky). The note you assigned will now
play C Major when you press it.
Since this is already possible in Single mode, a lot of producers use Multi mode to ‘cheat’ playing more complex
chords with one finger!
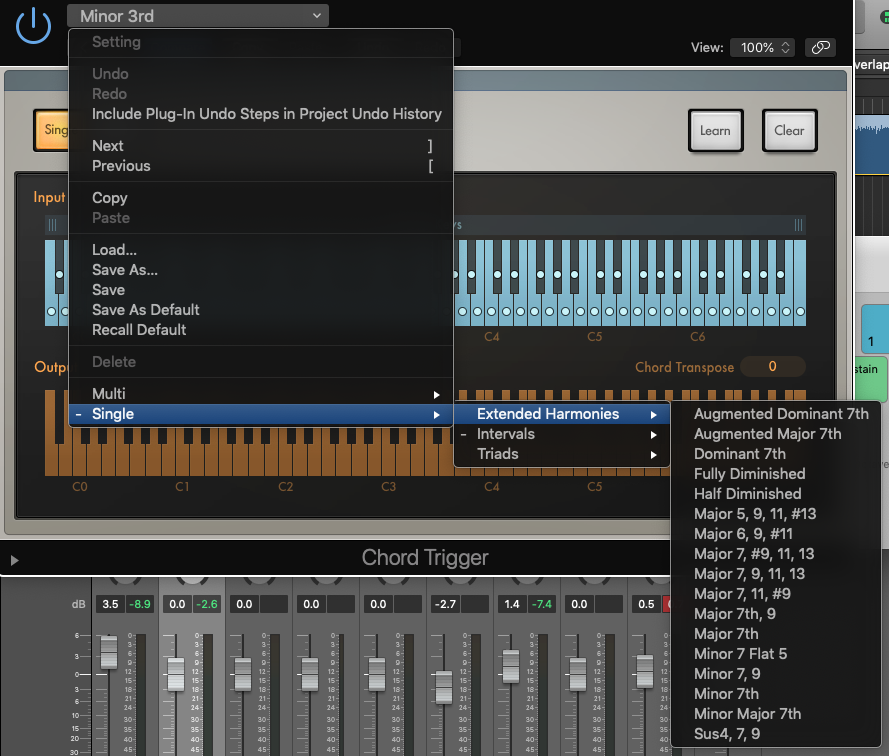
Advanced Settings
As we’ve established, Chord Trigger plays major chords by default, but what if you want to play Minors, or more
complex chord types?
In Single Mode, you can choose whether the notes that your Trigger Keys trigger are in a range of scales and styles,
from basic intervals (two notes) to much more advanced chord voicings.
In Single Mode, you can only tell the chords to play in one voicing style, which is cool, but does mean you can’t
throw in the occasional 7th, or mix between minor and major chords. This renders it somewhat limited.
In Multi mode, you can add a palette of certain voicings to your keyboard controls, and then add your own chords to
the remaining keys if you wish.
This is probably more practically applicable in a composition or performance setting. This can definitely be handy.
However, in order to give yourself a genuinely useful range of chords to work with, you would probably need some
intermediate music theory knowledge. As such, Logic’s Chord Trigger is best-suited to producers with good music
theory but perhaps lacking the speed and precision to play complex chords.
Don’t get it twisted – there is no shame in that! Captain Chords is different, however, because it can help those
with excellent music theory play complex chords with one finger, yet also help those with zero theory knowledge to
compose better music!
3. Modifier
New in Logic Pro X, Modifier is a tool that allows you to modify one incoming MIDI command and trigger another
instead. These MIDI commands are generally known as ‘CC’ commands, which stands for Continuous Control. They’re also
referred to as Control Change messages sometimes.
What these CC messages do is influence a chosen parameter, such as Velocity (how hard or soft a note is played),
Aftertouch (the effect that pressing down on the key after the note has triggered has on the sound), or Pitchbend.
For example, if you had a knob assigned to CC control of Pitchbend, you could play a MIDI note, then turn the
assigned knob and the itch would bend up or down as per the turn of the knob.
Modifier would give you the opportunity to take that CC command, that is regularly used to control pitchbend, and
assign it to a different control, such as velocity.
But why wouldn’t you just assign a different knob for velocity?
A good question! It’s all about your MIDI keyboard or controller. Basically, you might have a setup that you like,
or the setup that comes with the keyboard. It’s got a specific layout of knobs and functions, and you’re used to it.
But what if one of the songs you want to play requires use of an existing MIDI control, but you’re using a different
keyboard or controller for that song? Or, it’s just hard to reach quickly on the same keyboard because you’re hands
are busy elsewhere?
This is where Modifier comes in.
As soon as you turn it on, any MIDI modifications become live, so you can have a ‘shadow’ MIDI setup for certain
arrangements.
Let’s say you have a Mod Wheel on your MIDI keyboard, which you generally assign to an LFO. But, in one song in your
set, you’re simply sending MIDI messages to that keyboard, and are focused on a different instrument or controller.
Or, the same keyboard except the hand you would turn the Mod Wheel with is busy with… er… shaking a tambourine or
something. It doesn’t matter what the scenario is, the important thing is your Mod Wheel is suddenly hard to reach!
By telling Modifier to interpret Mod Wheel commands but apply them when triggered by a different knob – one easier
to reach – you can still use that control without tying yourself up in knots!
Equally, another way to apply the Mod Wheel’s LFO function without moving your hands from the key is to set the Mod
Wheel LFO to trigger in place of the Velocity setting of your MIDI keyboard.
Normally, Velocity is set by how hard or soft you press the keys. Now, the harder you press, the greater the Mod
Wheel LFO value. This adds a ton of expression options to your keyboard.
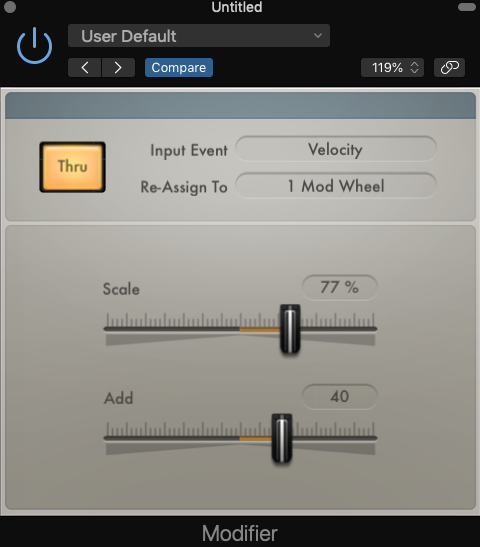
Let’s check out Modifier’s controls.
Thru
With Thru enabled, the selected controls work via either of your control sources. Disable Thru and the settings will
only trigger as defined in Modifier.
PRO TIP
Set Thru to a button on your MIDI controller, so you can enable your ‘shadow’ MIDI setup easily
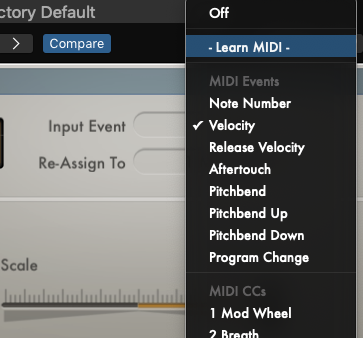
Input Event
This is the ‘new’ event, the one that will be triggered by…
Re-assign To
Re-assign to. This is your ‘old’ control device. In the example of the Mod Wheel function moving to a new controller
knob, this is where you enter Mod Wheel. The Input Event now functions as a Mod Wheel.
PRO TIP
The drop-down menus in Assign To and Input Event give you selectable control options. You can also teach new
controls to Modifier with the ‘Learn’ option.
Scale
This determines the amount of the effect that is applied per input value. 100% is the standard setting, which is
between 0-127 degrees. Adding percentage from the 100% point increases the sensitivity of the input source.
As an example, if you have a potential effect ‘power’ of between 0-127, at 100% Scale rate this will be applied at
the same rate as the Assign To function originally. In the example of a key trigger, that means the velocity at
which you hit the keys starts at 0 and goes up to 127 at a specific rate… 127 is reached by hitting the key at
maximum strength.
By increasing to 200% you will reach the 127 value by only pressing half as hard. The maximum possible level is still
127, so pressing any harder will have no effect. Unless you increase the value of…
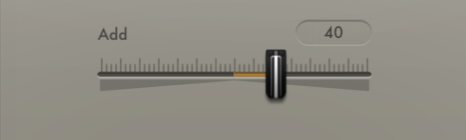
Add
This determines the amount of This slider enables you to increase or decrease the ultimate values of the MIDI effect.
That means, a higher Add value will increase the maximum level of the effect, while decreasing the Add value will
decrease the total level.
So, a ratio of +100 will double the amount of modulation that the value of 127 previously represented. If it were
volume, that would equal it becoming twice as loud.
Decreasing does the opposite – a reading of -100 would halve the modulation level.
Learn
The Learn button is at the top of the drop down menu in Input Event and Assign To. This is for instances where you
need to tell Logic which of your Midi controller knobs, faders or keys to use, and in what context. Hit ‘Learn’,
then adjust your chosen control. It’s another name for MIDI mapping
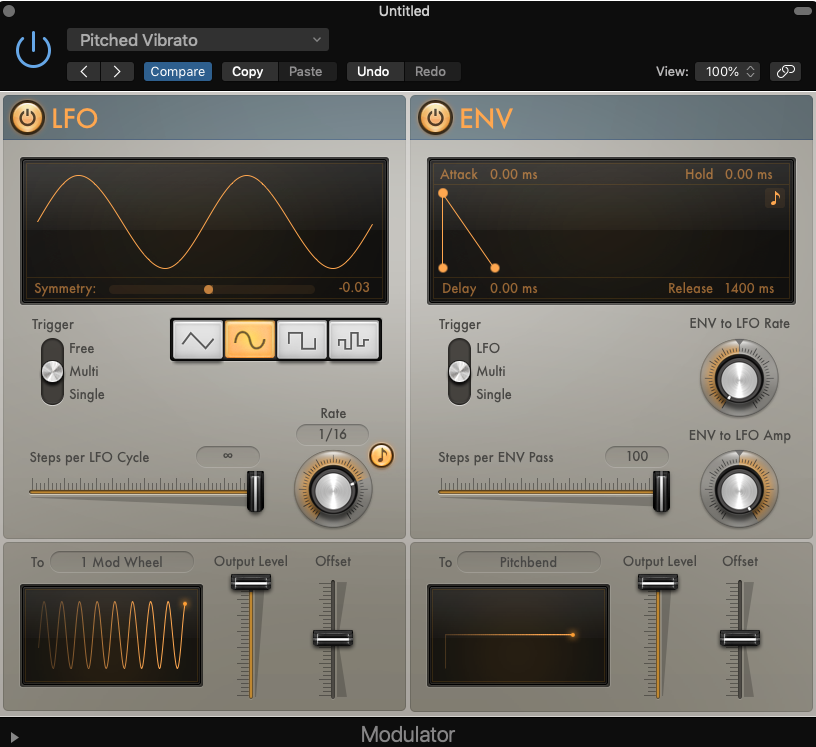
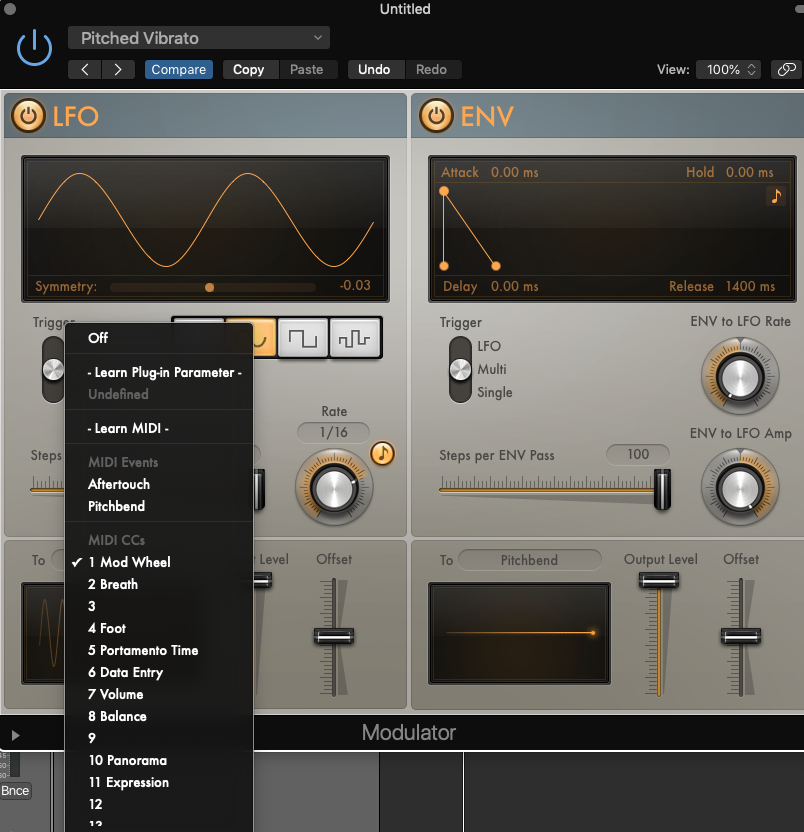
4. Modulator
The clue is definitely in the name here. Modulator modulates your MIDI instrument’s sound. It has some cool presets
so you can plug in and go. Alternatively, you can design your own modulations and decide which input sources trigger
them.
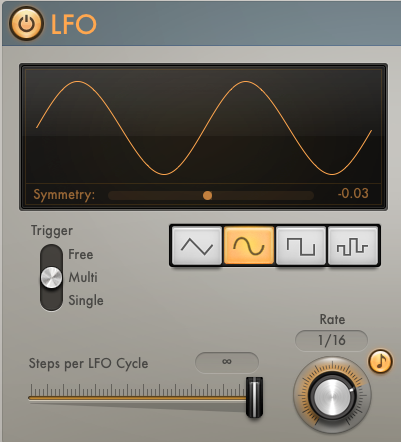
LFO
This is the left hand side of the plugin window. Unsurprisingly, it gives you control of the LFO and how it is
applied to the sound source.
Symmetry
How much negative or positive swing is applied to the LFO.
Trigger
Free means any incoming source will trigger the LFO. And you remember Multi and Single from the Arpeggiator keyboard
controls, right? The chords you made or setup there will receive this LFO modulation.
LFO Shape
There are 4 settings – Triangle, Sine, Square and Sawtooth.
Steps Per LFO Cycle (with Triangle or Sine LFO Shape selected)
This applies an increasing amount of stepping between LFO cycles. In effect, this is is how fast the LFO rate cycles
through. Lower values create more space between LFO cycles, making a stepping effect.
PRO TIP
LFOs use subtractive synthesis principles to remove aspects of the incoming synthesis and create the desired
effect.
Did you know, all subtractive synthesis boils down to on/off values? These values, when applied really fast, can
be imperceptible to the human ear and eye, which is why a Sine wave modulation looks like a curve.
It is, in fact, thousands of on/off messages, which look like squares, happening incredibly quickly. Smoothing
slows this down from 100% to 1, which renders the effect visible as only a small square.
Smoothing (with Square or Sawtooth LFO Shape selected)
This determines how powerfully the LFO shape is applied. Higher values soften the sharpness of the angles and reduce
the effects’ bandwidth.
Rate
This is tempo matched to the DAW, and offers divisions of 1/128 down to once every 32 bars for very slow LFO
modulation.
To
This is where you decide which of your MIDI controls will trigger the LFO. You’ll probably want to use a slider so
you can increase or decrease the amount of LFO on the fly.
Output Level
Determines the maximum value that your MIDI slider can input. Selecting 50% means your slider will apply 50% of the
LFO at its fullest.
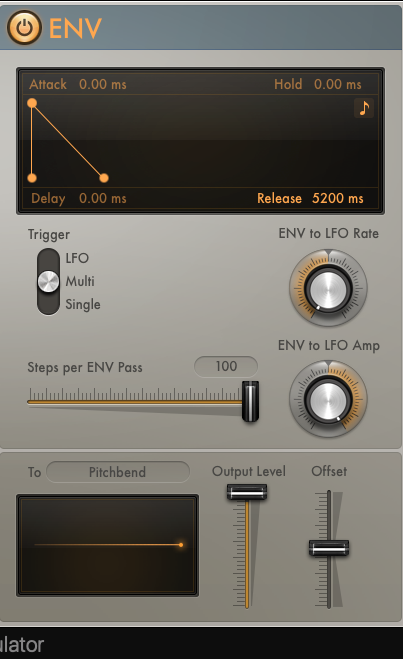
Env
The envelope is on the right-hand side of the plugin window. An envelope is like throwing a blanket over a bedsheet.
How fast you throw it on, how long you hold it down for and how quickly you release it directly influences how much
of the underlying bedsheet is visible.
It has 4 main parameters by which it controls how it applies to the sound.
Delay:
This is the gap before the envelope applies
Attack:
The speed at which the envelope value goes from 0 to 100%
Hold:
How long the envelope stays at 100% for
Release:
How quickly the envelope fades from 100% to 0%
Trigger
The LFO can trigger the envelope, or this job can be reserved for Single or Multi inputs from the Arpeggiator’s
keyboard controls. Since the LFO can already be triggered by these keyboard controls, it’s possible to have the
Envelope triggered by them too, having passed through the LFO first.
Env to LFO Rate
At zero, the LFO and the Envelope apply at the exact same speed (the speed of the LFO). Increasing the amount makes
the Envelope faster than the LFO, while decreasing makes it slower.
Env to LFO Amp
This relates to the volume of the envelope compared to the LFO.
Steps per Envelope Cycle
Here, you can control how many times the LFO must cycle through before the envelope will be triggered.
To
This is where you decide which of your MIDI controls will trigger the envelope. You’ll probably want to use a slider
so you can increase or decrease the amount of envelope on the fly.
Output Level
Determines the maximum value that your MIDI slider can input. Selecting 50% means your slider will apply 50% of the
envelope at its fullest.
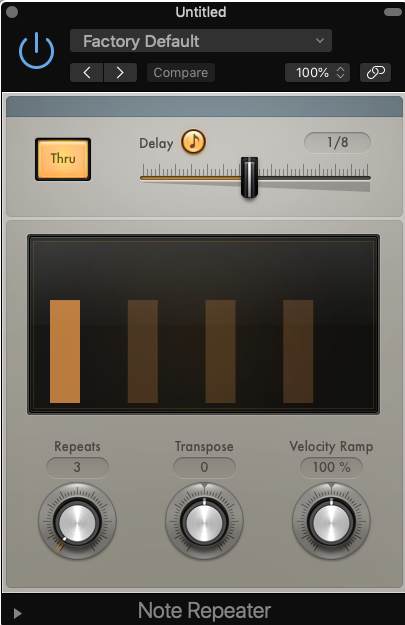
5. Note Repeater
As the name suggests, this tool repeats your MIDI notes. But don’t be fooled, it has great sound shaping potential.
Check out the below video where we use it on a progression in Captain Chords. By cycling through the presets, you
can see how each of the 3 parameters affects the sound.
Delay
How fast the notes are repeated. If the rate of repeat isn’t fast enough for the transposition to reach its
destination, it will only go as far as it can before starting over with newer MIDI notes.
Release
How many times the MIDI notes are repeated.
Transpose
The destination pitch of the MIDI notes. This works in tandem with the Repeat button, so the destination will be
reached by the set number of repeats.
Velocity Ramp
This defines how much and how quickly the volume of the repeated notes will increase or decrease.
Using Note Repeat with Captain Chords
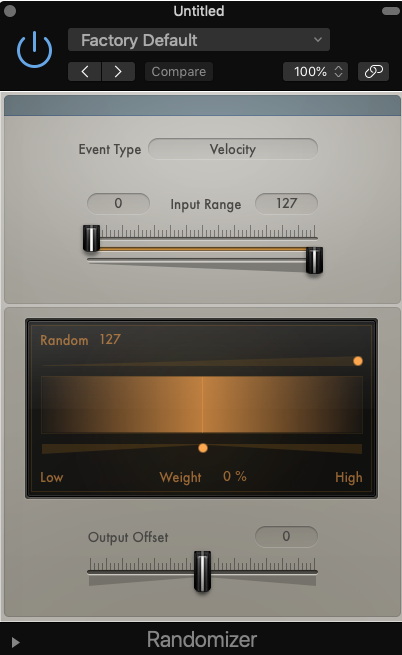
6. Randomizer
Randomizer is a great way of adding interesting variation to your MIDI performances. It’s particularly well suited to
MIDI clips or using your MIDI keyboard without velocity variation, as it can add human-like quality to an otherwise
perfect piece. This can be in the form of modulations in pitch, note selection, velocity and more.
Main Menu
This is where you can select one of the 4 presets, or write, load and save your own.
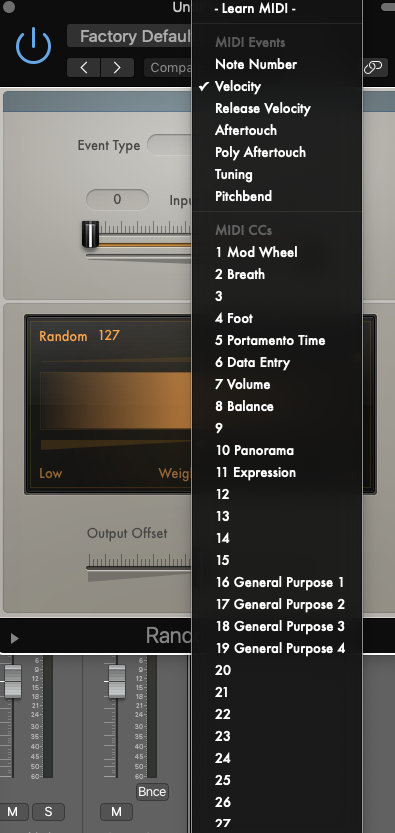
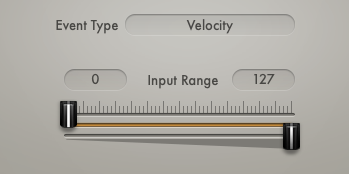
Event Type
Very similarly to using the Modifier, here you can choose which MIDI event you wish to use as a source for your
Randomizer. Choosing Velocity, for example, means the greater the velocity, the more randomization is applied.
Input Level (0-127)
This is the amount of effect to apply to the input level. Leaving it fully open, with a full width of 0-127
available, will mean any input signal strength from 1-127 will trigger the corresponding Randomizer MIDI effect.
Shortening the band will mean all values outside the band will not trigger the Randomizer.
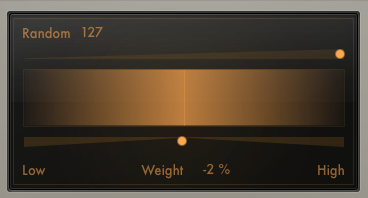
Random
This is the total amount of randomness that could potentially be triggered. The value can be between 1 and 127.
Low/High Weight
The depth of the randomness in terms of effect strength. This is a sum of any/all randomized parameters.
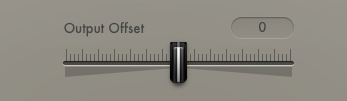
Output Offset
This is a feature that allows you to add value to the randomized MIDI effect value. That means if you have a
randomized MIDI effect that comes in at 80, you could increase the Output Offset to boost that signal by anything
from 1-127 additional value increments. The exact nature of these value increments depends on the input signal and
randomization parameters.
You can also tell the output signal to reduce the Randomized signal strength by a set number of value increments,
too.
Finally, turning it hard left or hard right will fix the randomization output level to a pre-determined maximum or
minimum, which is useful if you want to avoid big volume spikes etc.
7. Scripter
This is Logic’s version of Max For Live, and enables you to write your own MIDI commands in Java. These commands can
then be sent to any MIDI device via Javascript.
It’s complicated, and would require its own dedicated article to really tackle in detail.
It’s intended for use in conjunction with Logic’s Mainstage app, which is designed to enable advanced live
performance control.
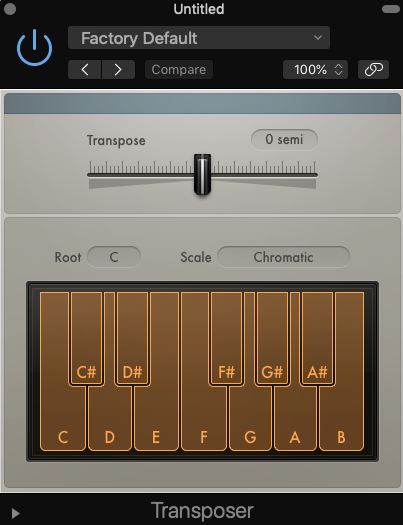
8. Transposer
Transposer is a tool for taking the notation input of your MIDI signal and adjusting it so it plays back at a new
pitch.
This is the foundation that Captain Plugins is built on, but we build much further into the concept, and have
developed the industry standard in intelligent chord and melody transposition and composition. We certainly think
so, anyway!
Logic’s Transposer is a neat tool. The limitations it has are offset by the simplicity of the interface, and it can
quickly help inspire cool new ideas.
You can change the root key, to transpose your selected scale. This means you can play a progression in C Minor and
tell Transposer to shift it to F Major, and it will move all the MIDI notes up or down the required number of
semitones to achieve the pitches they would have in the scale of F Major.
These effects can all be MIDI mapped to buttons or knobs for easy scale and key changes.
Captain Play takes this idea and refines it, by simplifying the user interface and allowing you to create bespoke
scale and key combinations in either chords OR single notes. You can use your computer keyboard or MIDI keyboard to
play along in whatever scale or mode you desire!
Transpose
A sliding scale between -24 and +24. You can manually shift incoming MIDI signals up or down any number of increments
therein. Remember, 12 semitones is an octave, and one whole note is 2 semitones.
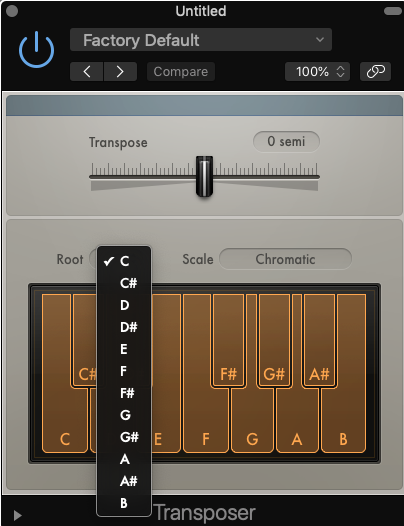
Root
Select the root note you wish to transpose to
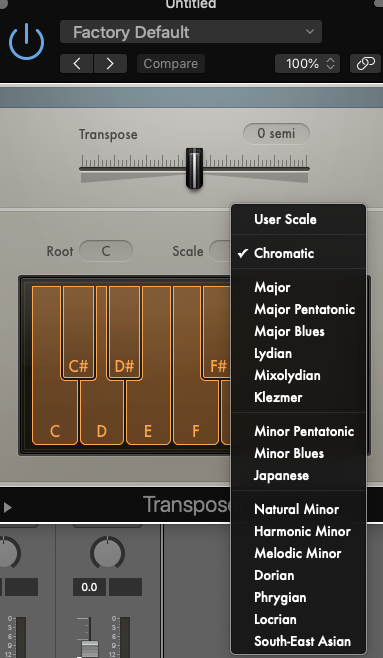
Scale
The basic scales are accounted for, such as Major, Minor, Dorian and Phrygian. Alongside, a few more exotic ones are
available, such as Japanese, but it’s by no means a comprehensive array.
Fortunately, you can add your own scale
Keyboard
A single-octave keyboard is visible. This is where you can create your own scale by selecting the notes you want
included, then selecting Save from the top menu. Also, you can transpose to different root notes on the fly by
pressing a note as the MIDI input enters the MIDI channel
9. Velocity
Velocity is the force that a sound is played with. So, on a piano, low velocity would equate to a gentle tap of the
keys, while high velocity would be akin to a pianist slamming the keys down with all their might.
Humans, not being robots (at time of writing, anyhow), play musical instruments with constantly varying degrees of
natural velocity.
Of course, the very finest players can control their velocity with precision, but even so, the element of velocity
and timing variation is what makes performances sound good. One of the major limitations with computer-based music
has long been an overly robotic performance sound, but this can be compensated against using Velocity tools in MIDI
effects.
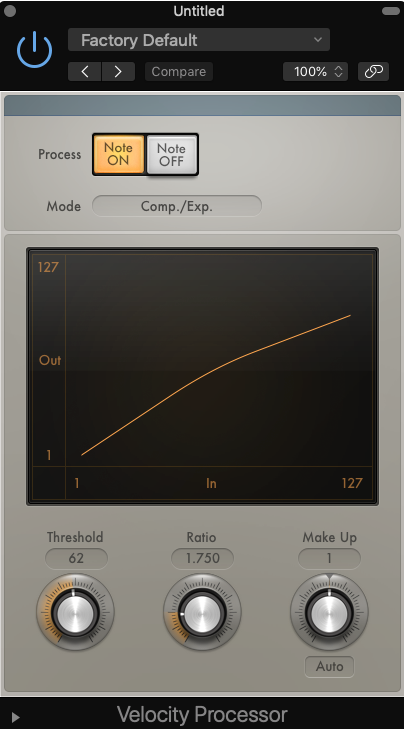
Comp/Exp
Compressor and Expander in one. Compression means it will boost the volume of signal below a certain ratio while
capping louder volume, and Expander adds gain without compression, so more notes go t the highest velocity. Notes
of, say, 80, could be set to actually sound like notes of 100 with the Expander.
Value/Range
Acts as a limiter. Value at its highest will ensure all audio is at the same, maximum velocity. If it’s at, say 100,
all audio under 100 will be boosted to 100 but no higher, while all audio above will stay at its current value.
Essentially, the quietest a sound could be is 100.
Add/Scale
This helps you set a bandwidth. Scale means anything below a certain sn velocity will be brought up to a higher
dynamic range within a scale compared to the rest of the velocity ratios. So, a quiet sound could get brought up in
volume, but only in proportion to the highest velocity ranked sounds.
Meanwhile, Add adds or subtracts a fixed value to/from each MIDI note
Threshold
This is like the gate… how much signal should be processed by the Velocity tool. If the Threshold is at maximum, all
the incoming signal will be processed. If it is at minimum, none of it will.
Ratio
The amount of total velocity adjustment per increment. So, 1:2 means a potential value of double the incoming signal
is possible.
Make Up
This determines the gain to be added to the output signal. This is useful particularly if you’re compressing a
fairly quiet performance and want to boost the overall output volume. This can even out the dynamic range of the
overall sound.
Auto
The Auto button is a way to set a total Make Up limit – so no volumes can exceed the chosen amount. This is useful
for avoiding volume spikes.
Smart Controls
These MIDI-controlled effects open up masses of creative options. You can control them by mapping certain parameters
to controllers, keyboards or any other MIDI-enabled device. This allows you to manipulate your MIDI instrument in
real-time. The feeling of live control is really addictive, and can yield different results than drawing automation
lanes.
But if you have a multitude of different MIDI effects running, you could quickly run out of knobs on your
controller! Plus, you’ve only got two hands, so can run out of those even quicker!
One really cool thing you can do in Logic is create use Smart Control to control multiple parameters with one knob.
You can map MIDI control of multiple MIDI FX units to as many or as few knobs or buttons as you like. It’s a
real-time saver, and a way to make some super creative sound designs.
Simply double-click on the MIDI channel icon, and Smart Controls will be rebvealed. There are some cool chord and
performance presets you can try tout, and options to MIDI learn the smart controls o your controller
Less is more
Total, random abandon with MIDI FX can quickly become cacophonous. Depending on your project, a little sonic madness
might be desirable, but controlled chaos is key. Experimenting is encouraged, but try and develop a basic
understanding of each tool while using it/ Knowing what you did, what you want to achieve and how to repeat it again
is a handy skill to have.
It can be tempting to fill every spare second with enthusiastic knob-twiddling, but perhaps it’s a good idea to let
the music play sometimes. You risk tiring the listener out otherwise.
Pitch perfection
While many of the effect types we’ve looked at have been destructive, don’t miss out on using others for composition.
Tools like Logic’s Transposer is really cool for pitching notes in new combinations. Modulating pitch, scale or other
tonal quality can generate new and inspiring ideas. It can also help you create music that sounds like it’s played
by a consummate pianist, which is great for those of us lacking in that department!
PRO TIP
Turn your MIDI Instrument into a concert pianist by combining Velocity, Randomization and Arpeggiator. Subtle
variations in velocity makes the playing sound more human-like, while arpeggios, pitch modulation and/or
repeated notes give the impression of a fast, dynamic performance. Randomize each function slightly and you’ll
be amazed how a simple chord progression can suddenly sound like it’s being riffed on by John Legend!
Write your own Chords using Captain Chords
It’s super easy to create your own ideas from scratch. Visit the official Chords homepage and see how it will help you explore music and write your own
original productions.