5 tips for mastering your own tracks.
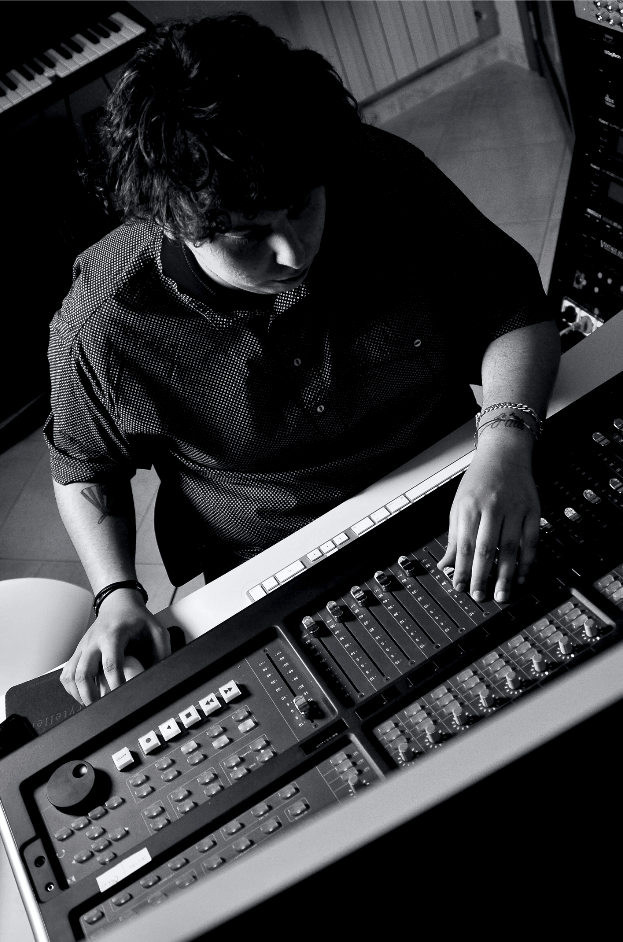
Photo courtesy of Emiliano Vittoriosi
Depending on your skill-level at the mixing stage, it can be useful to learn how to master your tracks as well. Professional mastering can take a lifetime to, well, to master, but if you have a good ear and plenty of patience, it’s more than possible to teach yourself the basics and build from there.
Adam Hignell runs through a few fundamental principles of the art of mastering:
1. Detach yourself.
If you’re going to master your own tracks, do yourself a favor and take some time out between mixing and mastering. You might want to work on a different track in between, or do something else entirely. The space will help you approach the master with a fresh mindset.
2. Fix problems in the mix, not the master.
While you can certainly brush over minor mix issues with smart mastering, any major mistakes should be addressed at mix level. Mastering is a process of delicate additions and subtle reductions – chances are that trying to fix a big EQ imbalance will force you to create more problems than you solve. Fortunately, rather than spending time back and forth with your mastering engineer, you can simply open up the mix project, fix the problem(s) and bounce out a new pre-master. With that in mind, in mastering try and EQ for balance and tone, not correction.
Write Chords Faster with Captain Chords
- Use Captain Plugins to write your own Chord Progressions, Hooks, Melodies and Basslines
- Export to your DAW
- Available on Mac and Windows.
Learn More
Buy Now
3. Reference. A lot.
It can’t be overstated how useful it is to reference what you’re doing at every stage of the master. You should A/B every change you make and ask yourself whether it has made a positive difference. Don’t just twiddle dials for the hell of it.
In addition, reference your master against similar-sounding tracks. If you’re aiming for a specific sound, there might be hundreds of tracks to reference with, which is handy. But if you feel your music is more unique, try and find tracks that have a similar EQ balance. Comparing your work to that of better mastering engineers can only help yours improve.
There are some great plugins out there that can help you do this, too. Izotope’s Ozone is one such tool. In Ozone 8 and 9 LINK https://www.izotope.com/en/products/ozone.html, there is a powerful plugin called Tonal Shaper, and in Ozone 9 there is also Match EQ. Tonal Balancer allows you to add the audio file of your reference track and give you a direct, real-time comparison of your master against the refernce. Match EQ goes a step further and algorithmically matches the EQ of your track to the reference’s EQ. Magic!
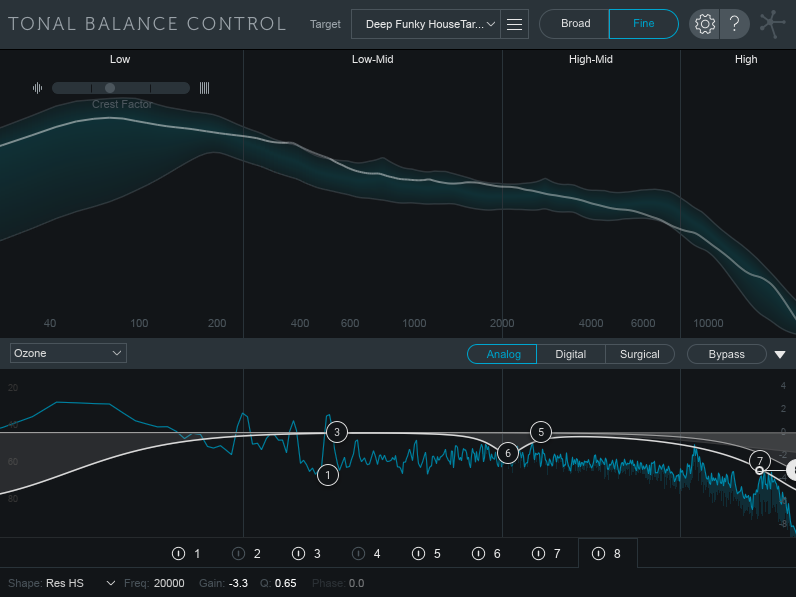
Other reference points you will want to consider are; stereo width, brightness, bass/sub-bass compression and overall cohesiveness. Recognising where your master falls down compared to professional masters is a time-worn practice, but the more you actively consider them, the better your ears will become at identifying and correcting accordingly. Exciters can be great methods of brightening up mids and highs, while imaging/stereo wideniing can broaden a narrow soundng mix. Meanwhile, a little multi-band compression can allow you to get deep into the low-end by limiting and/or compressing the bass without restricting the mids and highs.
4. Louder isn’t always better.
Volume is a vital part of mastering, but remember you ant to get the track as loud as you can without losing the dynamic range that gives life to the recording. If it starts to sound abrasive after a little while, chances are you’re dialling up the limiter a little hard. Turn it down, and see if it sounds more alive.
You should also watch your mixing desk – as you master, the overall volume will naturally increase, so dial it down again on your desk. That way, you know that changes you make don’t just sound better because they’re louder to you.
5. Understand volume targets.
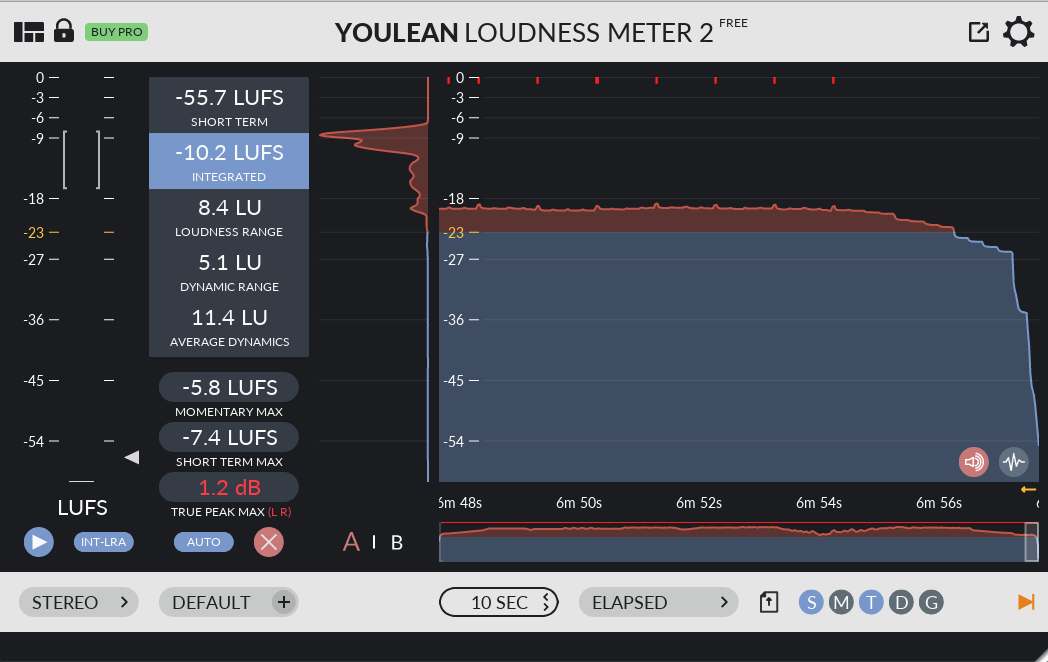
You also need to be conscious of end-product volume level. Metering is a real asset here; there are many useful metering tools such as Youlean’s excellent free plugin LINK https://youlean.co/youlean-loudness-meter/. By visualising the overall volume of your track, you can adjust your limiter settings to fit. For club/DJ-friendly masters, you’ll probably want a RMS/True Peak of about -0.1db, and a LUFS reading somewhere between -11 and -8LUFS. If mastering for TV or broadcast, you’ll want to hit no more than -14LUFS for fear of distortion at the broadcast end. It’s also probably wise to aim for an output RMS/True Peak of -1.0db since you’re not aiming for the loudest sound, but the clearest.
What the LUF are you on about?
If you don’t know what LUFS, RMS and True Peak are, don’t worry about it too much – it’s not as complex as it sounds.
RMS/True Peak is almost always visible on your limiter… if you’re in the red, that’s bad. Meanwhile, LUFS are basically a more user-friendly way of ascertaining overall volume for different platforms. The most important consideration, still, is how good it sounds. Sometimes a banging track sounds great at -9LUFS, but others need more dynamic range, so a more gentle -11LUFS may be a wise move.
Trust your ears/learn to listen better.
A final freebie… mastering is about knowing when to apply processing, and when to let things be. While there are books written on the ins and outs of this, the best tool you have is your ears. Hearing clearly, trusting your gut and learning to listen to every nuance in the music is just one of those things – it takes time to master. Maybe that’s why they call it mastering. But don’t be too intimidated. With the powerful, affordable plugins available to modern producers, mastering your own club/radio-ready tracks might not be as far away as you think.

