Get special upgrade deals!Sign in to see if you qualify for deals.
Your cart is empty
There are no items in your cart
Taxes:Calculated at checkout
Subtotal:$0.00
Keep shopping
You own this software | Purchased on
Included Software:
Get special upgrade deals!Sign in to see if you qualify for deals.
Join Mixed In Key
Please log in again to continue.
Please sign in to view your owned products.
or
Email address
Please enter a valid email address.
By signing in, you consent to receive marketing emails and text messages from Mixed In Key. You may opt out at any time.
To verify your email, we've sent an email to . This code will expire in
You can resend your code in ()
Didn't get a code?
You've entered an invalid code. Please try again
Your code has been resent, check your inbox. If you're having trouble check your junk mail.
Tell us about yourself
Please enter your first name
3 Killer uses for Multiband Compression in music production.
One compressor is hard enough to get your head around. Strapping a stack of them together is almost cruel on us poor producers. How are you really supposed to use multiband compression, and what can it really do for your tracks?
Find out with our 3 killer tips for multiband compression.
Note that this article is not concerned with multiband compression in a mastering context.
Contents.
1. Rebalancing uneven audio.
2. Replacing specific frequencies with Sidechain.
3. Controlling synths: resonance and filter sweeps.
What is multiband compression?
Multiband compression is a method by which we can apply compression in differing degrees to different parts of the frequency spectrum. It’s like having separate compressors for lows, mids and highs. Each compressor, or ‘band’, can have completely different ratio, attack, threshold and release settings.
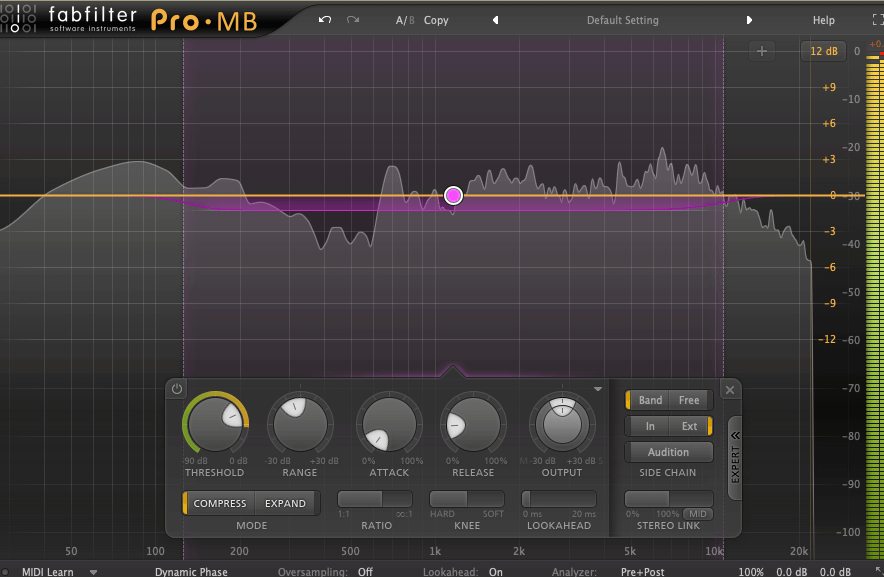
Some multiband compressors have a fixed number of bands, such as Waves C4, while others, like FabFilter’s Pro-MB can host as many as the user desires. You can also set the input source of any band to external and sidechain the multiband compression to other input sources.
PRO TIP: .
One important consideration, when using a multiband compressor, is the distribution of the bands. It’s important to divide the bands according to the material being compressed. For example, if a vocal is present between 120Hz and 4000Hz, having a band inside that range, cutting the vocal in two, could cause strange reproduction, particularly if the settings in each band are very different.
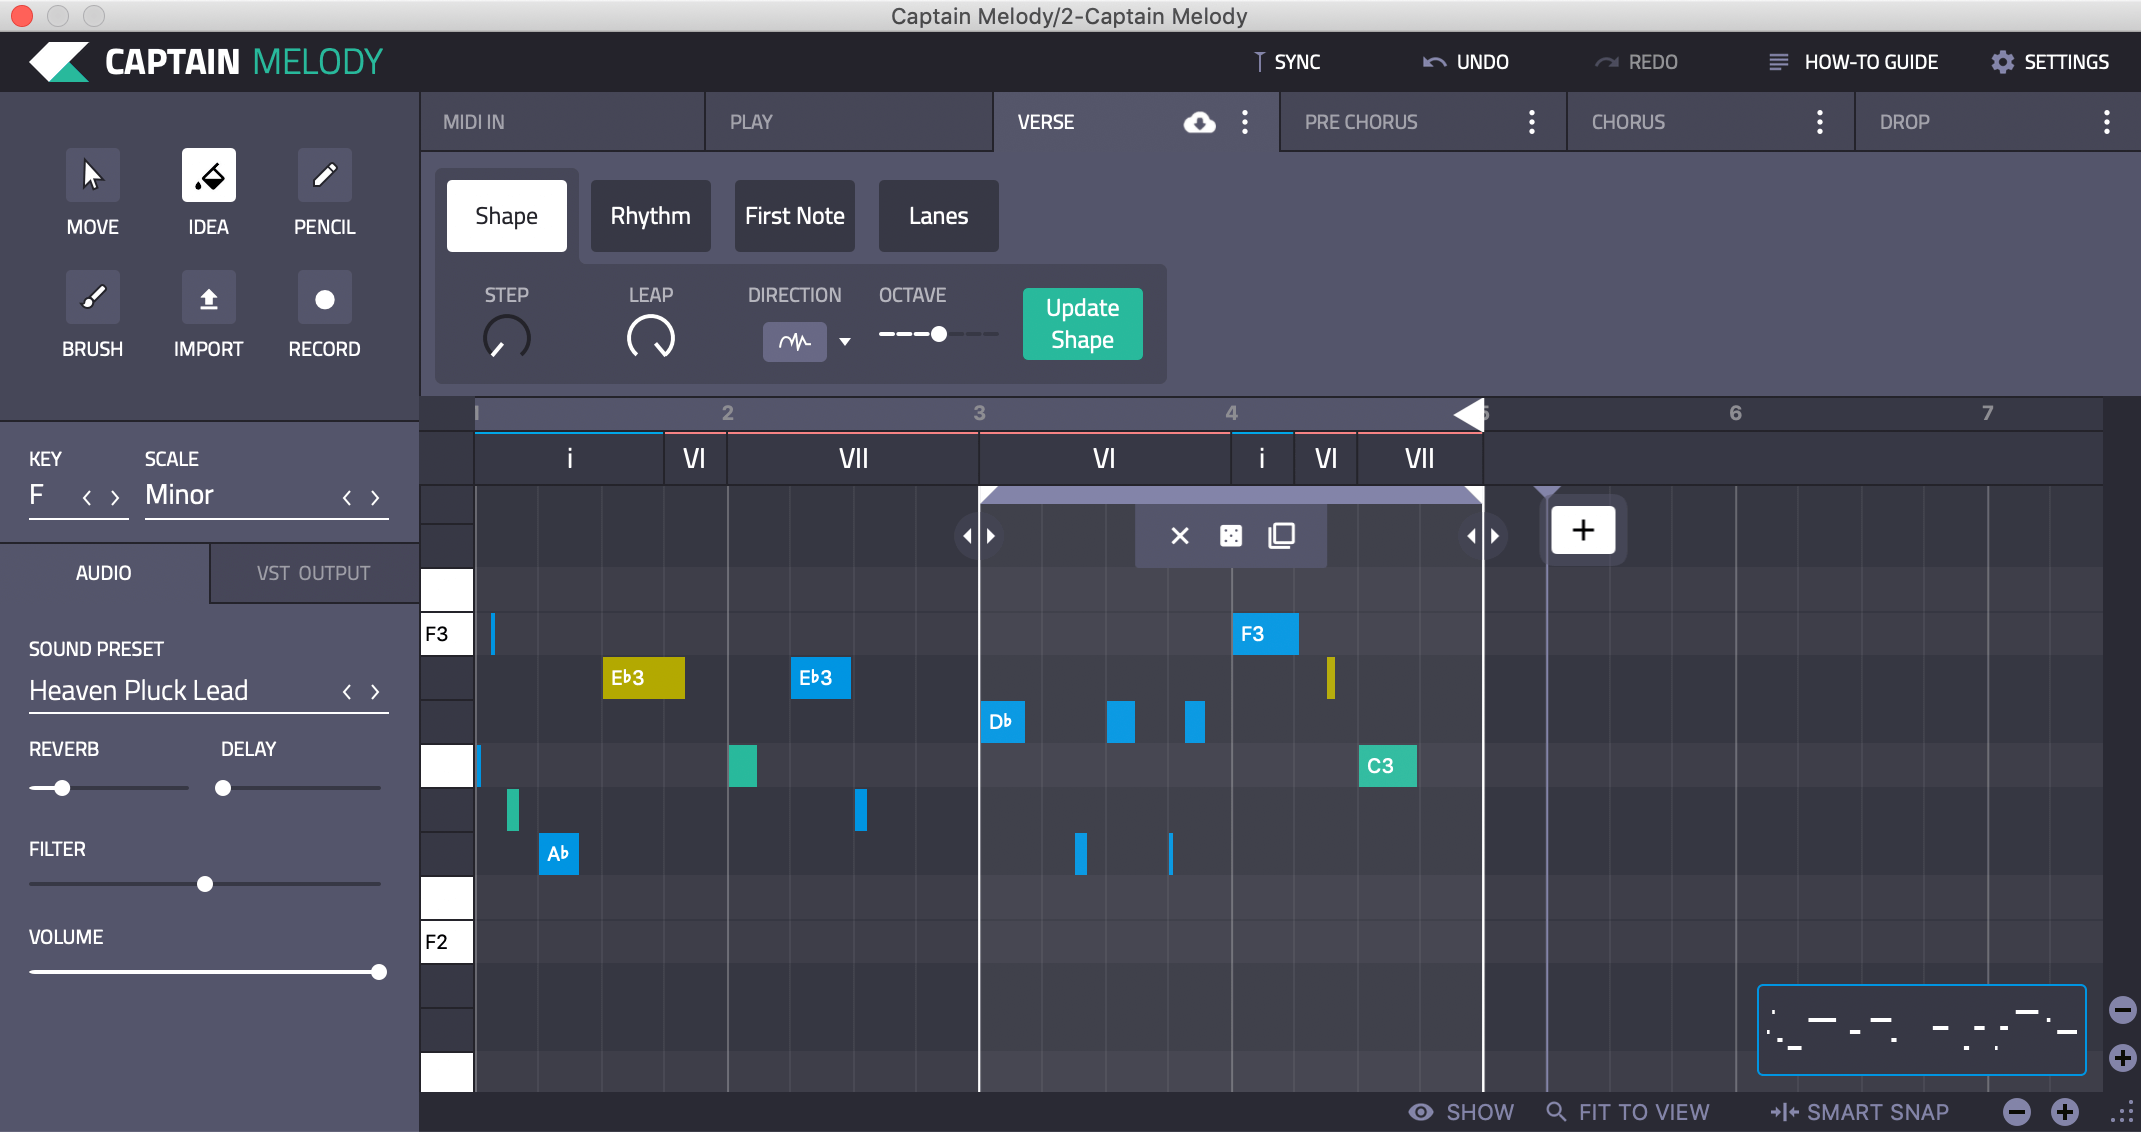
Write Chords Faster with Captain Chords
Use Captain Plugins to write your own Chord Progressions, Hooks, Melodies and Basslines
The most common application of multiband compression in a production context is probably creating conformity in an uneven recording. This might be a bass instrument which loses bass in higher notes, or a vocal recording where the singer struggles with mic technique and drifts away from the mic occasionally.
Traditional, single-band compression will help boost the quieter parts of the signal, but the louder moments may have more bass and therefore trigger the compressor much more aggressively and cause all kinds of problems. You could treat this with volume automation but that’s an imprecise, cumbersome solution. Multiband compression is much more elegant.
In the case of the uneven bass distribution, multiband compression can be used to tighten the bass while allowing the articulation and dynamism of the expressive high notes.
By aggressively compressing the lower frequencies while still allowing higher frequencies dynamic range, we can achieve a consistently present low end, while mids and highs can continue their more expressive dynamism. Bass frequencies can be compressed more aggressively since we like to perceive them as a thick blanket of sound. The articulation in bass sounds comes from the low-mids, mids and higher frequencies.
With vocals, we can compress the mids more aggressively than the lows and highs, which may help to bring out the vocal itself, even when the vocal is quieter. By choosing to apply much less compression to bass and highs, we avoid squeezing muddy lows and noisy highs when the midrange compressor needs to work harder to bring out the vocal itself.
We’ll take a look at an example of this in practice below.
This bass part is boomy in places but lacks articulation definition in the mids. It sounds a little wooly.
With some multiband compression we can thicken and tighten the lows while accentuating the midrange. Gain Make-up then brings the sum level back to match the uncompressed recording.
2. Sidechain multiband compression: replacing or emphasising frequencies.
This is an alternative to EQ ducking or filtering, which I think works more transparently as it keeps more of the sample character intact. It’s best applied to a full track when replacing a bass drum or bass/sub bass part, although you can also use it to add new drums. However, you run the risk of losing important midrange detail.
You can also use this technique as an alternative to traditional sidechain compression between kick drum and bass, or between vocals and the rest of your track.
Here’s how it works:
1. Add a multiband compressor to the sub mix or sample audio channel.
2. Add/activate bands in the frequency areas you wish to affect.
3. Set the input source to External on each band.
4. Set the sidechain source as kick, bass, or whichever audio source you want to insert.
5. Apply your desired compression settings to each band. Compression will be applied at the settings, only to the frequency band specified, and only when the input source triggers it.
Let’s try that out:
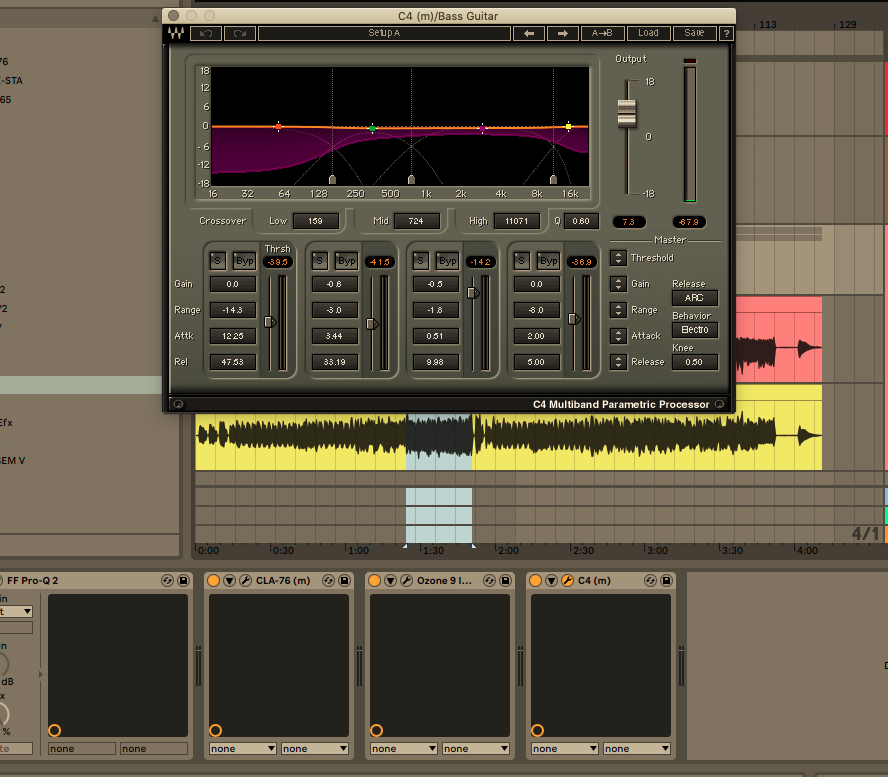
Replacing kick drum in an audio sample.
All settings examples are for guidance only. You’ll want to adjust them to suit your project.
Frequency band 1: 30Hz – 280Hz.
Threshold: -30db.
Release: 150ms.
Ratio: 4:1.
Frequency band 2: 3000Hz – 3500Hz.
Threshold: -6db.
Release: 150ms.
Ratio: 4:1.
Here, a fast attack triggers the compressor as soon as the new kick hits. The Threshold is set aggressively, so as soon as the sample reaches just -30db the compressor bites. The Ratio is 4:1, a 4dB increase at the input would be needed to cause the output to increase by 1dB. Below the threshold, no gain reduction takes place, so the signal passes through unchanged. This is the key reason why I like to use multiband compression rather than volume ducking – it sounds more natural, and the bass tones in the sample source is compressed – thus thickened – rather than filtered. This means that some original tone can remain, yet the kick sounds like it belongs. EQ ducking often sounds forced in comparison.
The second band is not always necessary, but can often introduce the click/attack of the new kick drum to the sample. You may or may not want this, so adjust to taste.
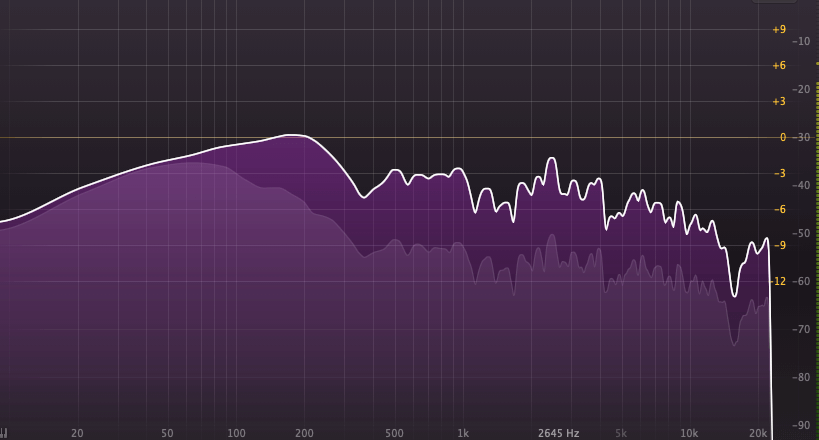
The following audio is a sample from ‘Night Force – Hold The Night’:
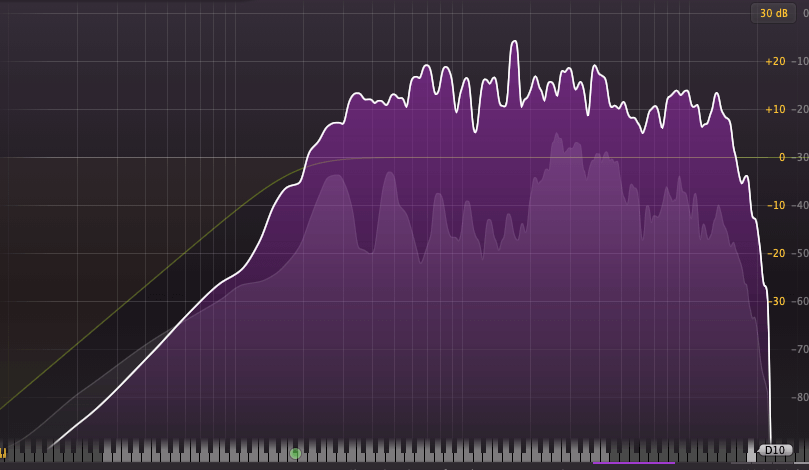
It’s a great track, but compared to modern standards is lacking low end. We can see that in the spectral analysis, there is a steady decline in low end from about 120Hz:
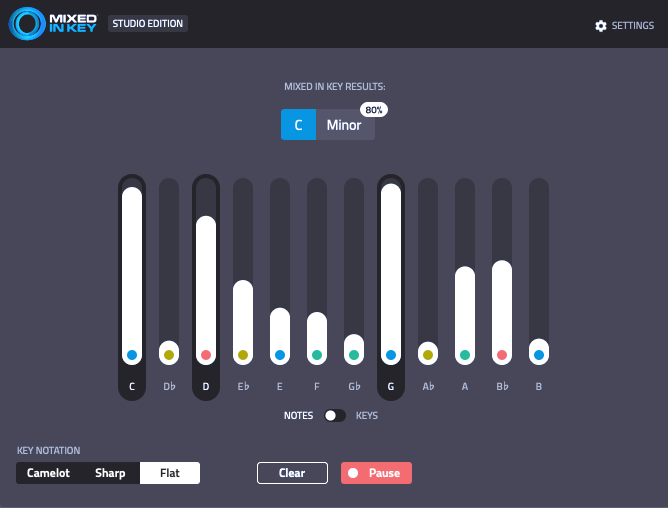
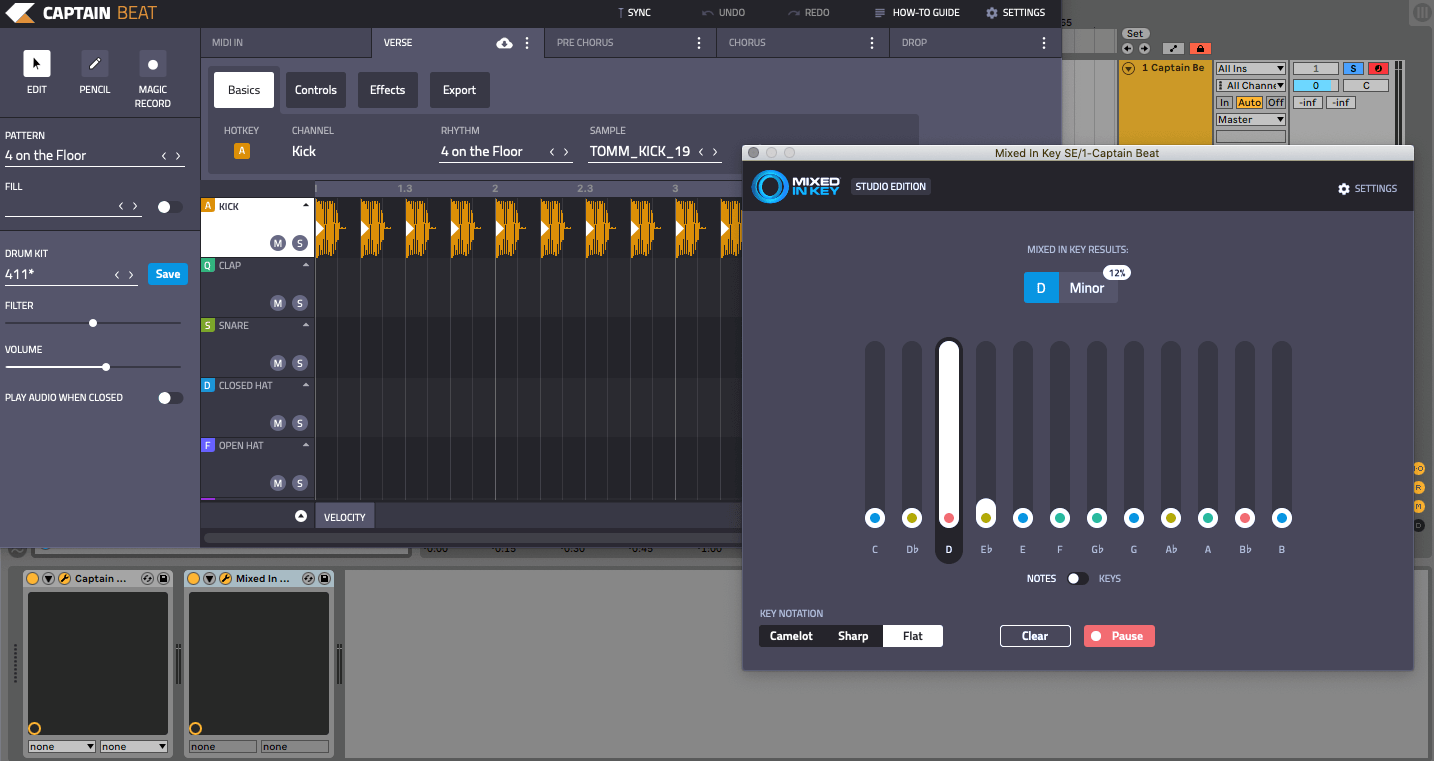
I want to add a sub-heavy, modern kick drum to it. In order to do that, first I need to tune my new drum to the original. With Mixed In Key Studio Edition, I can do that in a heartbeat.
Mixed In Key Studio Edition tells me in seconds that the original track is in C Minor, and has a predominant notation profile of C, D and G. Other notes are present, but I can be confident that a bass drum that registers in either C, D or G will sound in tune.
Next, I use Captain Beat to try out some samples while I analyse them in Mixed In Key Studio Edition. I find a great sounding bass drum hitting the note of D.
Next up, it’s time to add the multiband compression. I’ve used very similar settings to the table above, although FabFilter’s Pro-MB doesn’t have Ratio, instead it has Range. The effect is very similar – the higher the range/ratio, the louder the incoming signal (in this case the kick) can be, before the output (composite signal) raises itself by 1 decibel. Anything below the Threshold level remains unchanged, so the relationship between threshold and range/ratio is crucial.
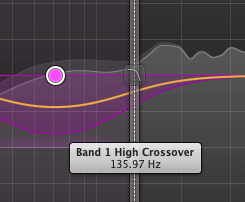
With the settings applied, we need to find the right crossover between the bass band and the unaffected section between bands 1 and 2.
Here, the snare from the original sample peaks at around 130Hz, which makes the crossover decision a no-brainer. In order to keep the snare, I set a crossover of 130Hz. I’ll still be affecting plenty of the low end with my new kick.
Let’s hear it in action:
2. Emphasising vocals.
Frequency band 1: 250Hz – 9500Hz.
Threshold: -4db.
Attack: 1ms.
Release: 40ms.
Ratio: 2:1.
Here, we are using compression to help the vocal shine in the mix. You can do this with traditional compression, but you’ll also be compressing parts of the sub mix that has little or no vocals present.
By using softer ratio and threshold, we are making the compression effect a lot more subtle. It means the ducking will be almost transparent, but should help the vocal lift itself from the sub mix, which is always a good thing!.
Listen to the vocal against the instrumental sub mix with no multiband compression:
And here, with multiband compression lightly applied across only those frequencies covered by the vocal:
It’s subtle, but there’s a noticeable definition in the vocals, while the instrumental sub mix still sounds solid. To achieve this, first I identified the frequency range of the vocal – 250Hz to around 9000Hz.
And here are the compression settings – very similar to the table abve, but of course they are merely guidelines.
3. Controlling filter sweeps and resonance in synths.
Synths can achieve a world of sounds and modulations, which is why we love them so much. But, sometimes they do things that cause great stress on our carefully managed EQing, compression and gain-staging. For example, a high resonance can cause a large spike in the frequency spectrum, and sweeping resonance up and down – such a cool effect – can cause this resonant spike to ride roughshod over our mix.
To solve this, we can of course use a traditional compressor to tame the spike. But the degree to which we may need to squash the spike sweep might also crush the bass frequencies more than intended. A multiband compressor can save the day here.
By applying a multiband compressor to affect the peak level of the centre frequency of the resonance sweep only, we can keep the rest of the frequency spectrum intact.
Here, we can see how a resonant sweep has a large peak level which rolls down the frequency spectrum into the low mids.
A resonant filter sweep in action:
As you can see, there is a huge spike in the frequency spectrum as the resonant sweep cascades down the range.
However, we can tame it without reducing the bass level by clever use of multiband compression:
I have turned the multiband compressor on and off at various intervals to give you an A/B comparison. When the sweep is shrill and unpleasant, the multiband compressor is off.
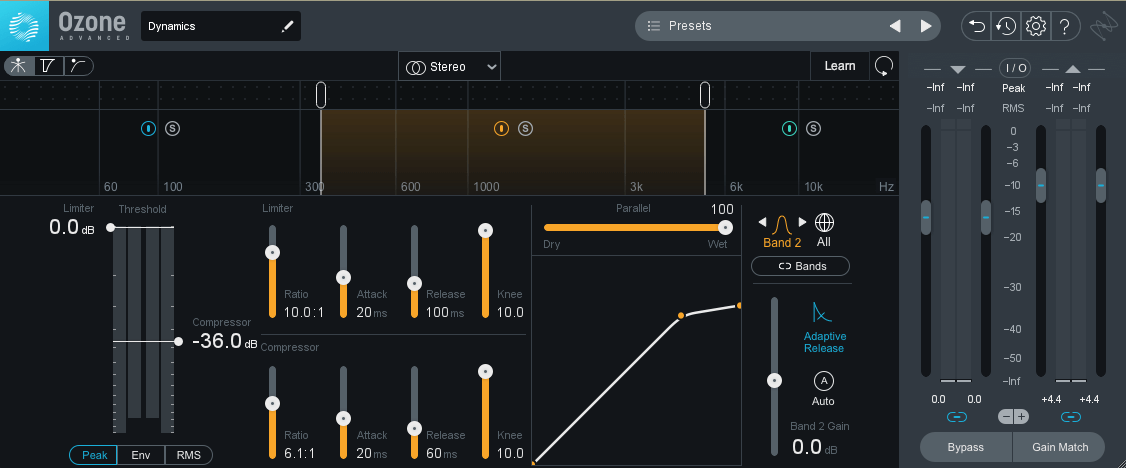
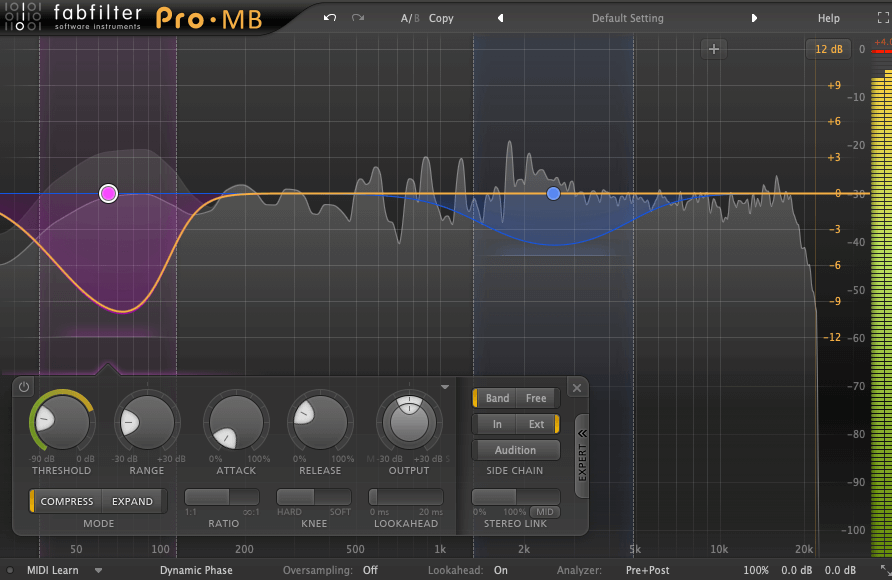
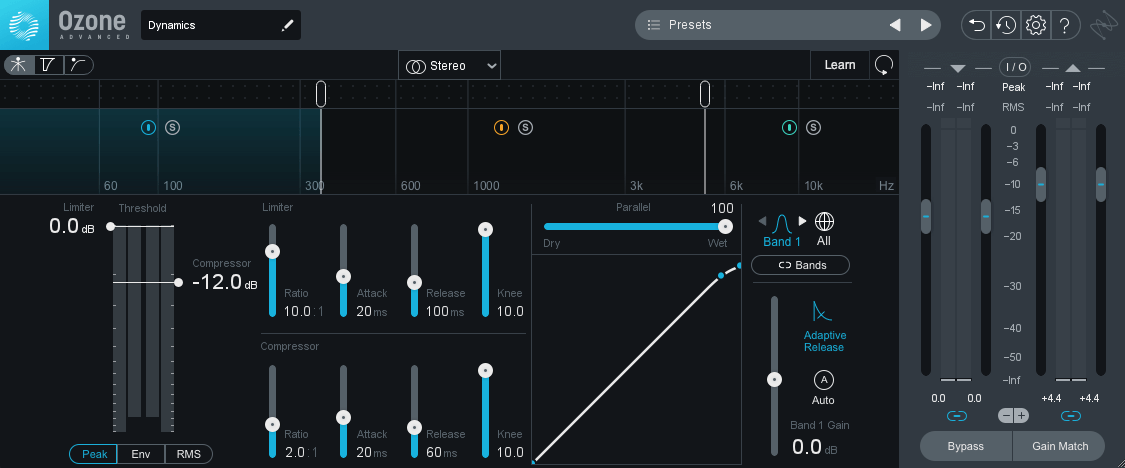
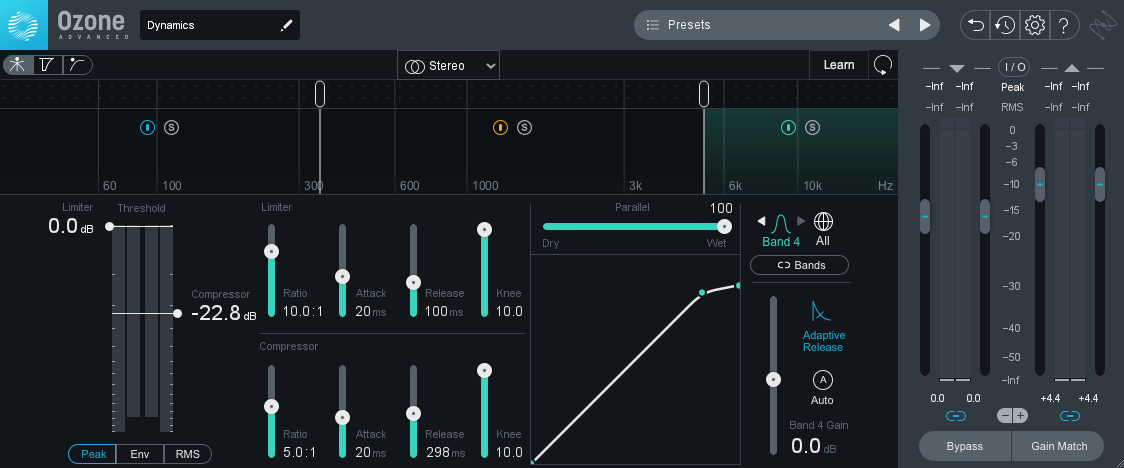
Check out the settings I used in Izotope Ozone 9’s Dynamics plugin (which is a multiband compressor by another name).
This is the bass setting. There’s very light compression. At this stage, I want to focus on taming the highs and mids before applying further compression to the processed signal.
Band 2 has a much more aggressive threshold and a Ratio of 6.0:1. It’s time to tame that signal!
Because highs carry less acoustic energy I didn’t need to compress quite so hard, but it’s still fairly aggressively crushed. Ozone 9’s Dynamics plugin has a very handy spectral analyser which indicates the processed signal gain reading, so I could be sure that my settings were taming the resonance sufficiently.
About the author:
Adam Hignell is a music producer, mastering engineer, DJ and label-owner based in Brighton, UK. When not providing content and tech support for Mixed In Key, he produces music under the alias Don Dayglow, provides professional mastering and mixing services, and runs the independent Disco/House label Particle Zoo.